Entertaining world of macrame. Butterfly in macrame style from PlotkoKatia Weaving simple butterflies using macrame technique
In this master class, I showed how to weave the upper wings of our butterfly. Now it remains to make the lower wings and torso, and put all the details together. This will be the most difficult and interesting part of creating a butterfly.
I tried to describe the whole weaving process in as much detail as possible, so I really hope that you will get the same wonderful butterfly that will delight you, serving as a decoration for your dress, blouse or even just a bag!
So, let's continue our butterfly!
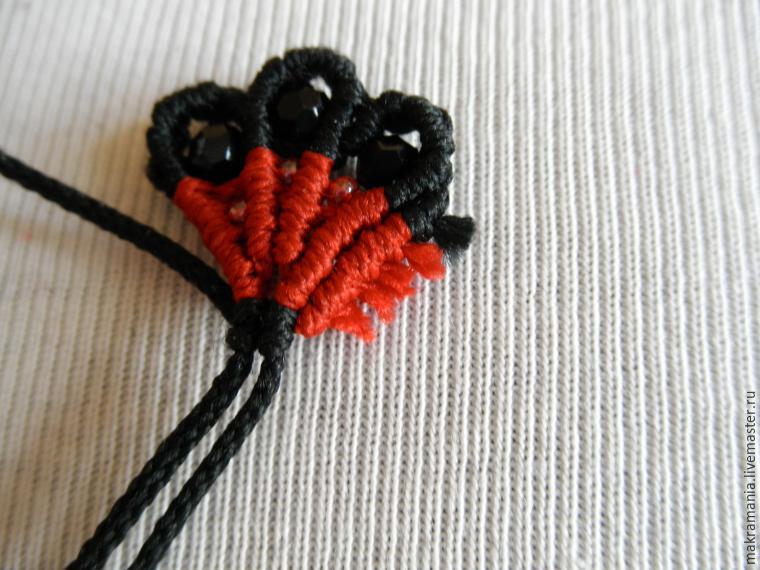
1. For weaving the lower wing, we take 2 black and 2 red threads of 40 cm each. And fasten them with pins.
2. We take the second thread on the right as a warp and weave a row of six rep knots on it.

3. Now we take the first thread on the left as the basis and with the second thread weave a curl into three knots on it.

4. On the thread closest to the curl we string a faceted bead, and through one thread from it we string a red bead.

5. Now we take the first red thread on the right as a warp and weave a row of six rep knots on it.

6. Now we take the first thread on the left as the base and with the second thread weave a three-knot curl on it.

7. We string a bead on the thread closest to the curl and string a red bead through one thread from it.

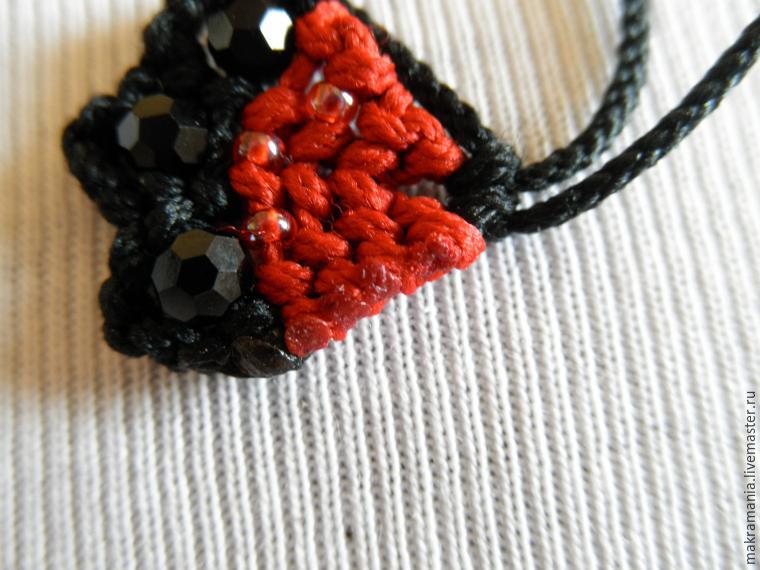
8. Now, on the same warp thread, we weave a row of five rep knots.

9. Now we take the third thread on the left as the base and tie 2 rep knots on it.

10. On the same warp thread, weave a curl into three knots with the second thread. We string a bead on the thread closest to the curl, and string a red bead on the next thread.

11. Now we take the thread of the base of the curl and weave a row of five rep knots on it.

12. Now we take the first thread on the left as a base and weave a row of five rep knots on it.

13. Now we take the thread that served as the basis for the just woven row and tie it with two rep knots on the warp threads of the previous rows.

On this, the lower wing is ready.
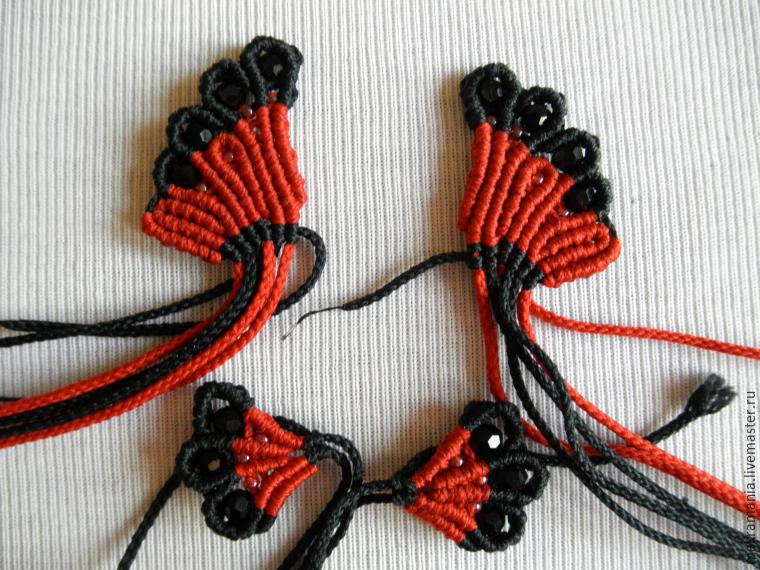
Now we weave the right wing according to exactly the same pattern, with only one difference, you need to mirror the direction of all nodes in a mirror order.
Here are the two finished lower wings of our butterfly:

14. Now we cut the threads at the bottom of the wing. But only at the bottom, the side threads will still be useful to us.
I leave the tips literally 2-3 mm, and melt them with a lighter.
This is what the underside of the wing looks like with soldered threads.
15. We cut and solder the lower threads on all four wings.
Now we begin to weave the body.
16. To do this, take two black threads. One thread is 30 cm, the second is 15 cm. Fold them in half and fasten with pins.

17. We take one end of a long thread as a basis and tie two rep knots on it with short threads.

18. Now turn the weave 180 degrees so that the short threads are sticking up. These threads will be the antennae of the butterfly. Also, we take a separate black thread of 30 cm, and fold it in half and attach it side by side.

19. We take the thread fixed next to it as a basis and tie 2 rep knots on it.

20. Now we tie each of the two working threads with one rep knot on each side of the weave.

21. Now on the sides of the body we attach the upper wings with pins, we will connect them to the body.
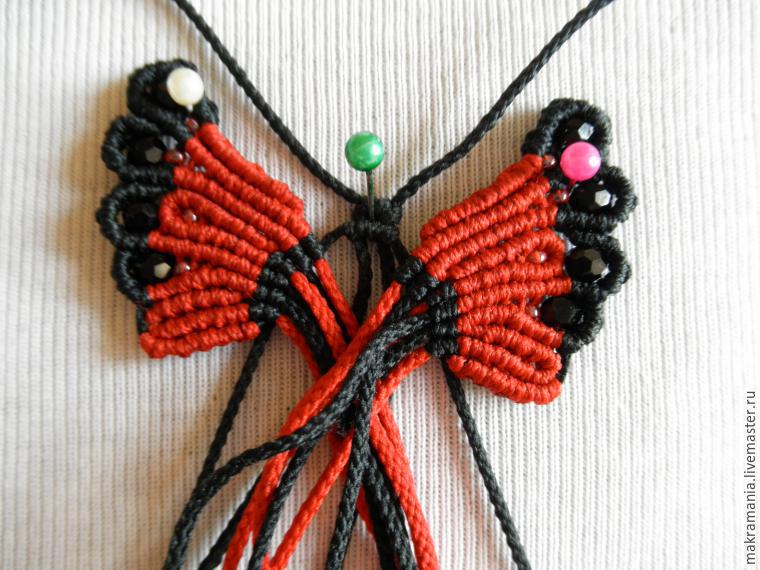
22. To do this, we take only the red threads remaining on the sides of the wings. We take the extreme threads of the body for the warp threads and tie 3 rep knots on each side of the body with red threads. We simply skip the black threads coming from the wings, they remain under the weave.

23. We tie a beaded knot on the top two red threads (this is the same rep knot, but tied back to front, that is, with the wrong side towards us).

24. Now we tie two more bead knots on the sides, and below on the two central threads there is another bead knot.

25. Now we take 2 threads that serve as the basis for the body (these are the threads on which we tied the wings) and on these threads we tie one rep knot with threads that come from the central bead knot. We simply skip all the other threads inside the body, putting them aside for weaving.

At this point I want to make a small digression.
Only now, while collecting this master class, I noticed an error in my weaving in the photo. As a master, I am very ashamed of such a mistake, but nothing can be changed. On the right side, the rep knot is tied correctly, that is, with a thread coming from the central bead knot, but on the left, I mixed up the working threads and tied the rep knot with a thread coming from the side bead knot.
"And on the old woman, there is a hole." So, also be careful in this place :)
26. Now we take the small wings and turn them 180 degrees so that their soldered side is at the top, and pin them next to the body.

27. Now we take two red threads coming from the body as a base and on each side we tie 3 rep knots on them with threads coming from the wings.

28. Now we tie with a beaded knot 2 warp threads on which the upper wings are tied. After that, we connect the threads in pairs with bead knots in the lower part of the body. Three pairs of threads - three knots. The threads of each bead knot, as soon as they are tied, are put aside for weaving.

29. Now it remains to finish only the tip of the body. As you can see, the two warp threads remaining at the bottom are red. I could have just tied them with a beaded knot, but I didn't want to leave such a bright spot in this place, so I did this: I took the last two black threads and pulled them tightly with a beaded knot right over the red warp threads.

30. Now we attach a pin for a brooch to our butterfly. I tied the pin to the body with the usual knots, using the threads that remained on the sides.

31. Now just cut off all the remaining threads and solder them with a lighter.

Another point is the mustache. On the two threads left for them, we tie knots, cut off the excess and melt these knots with a lighter. In order for them to bend beautifully and evenly, you need to do this: with your fingers we bend the antennae a little and draw it under the fold with a lighter, just a little bit so that the thread does not have time to melt much, but it “burns” a little. Then the antennae will remain in the position in which we want.
When the butterfly is completely ready, it needs to be straightened a little. Pull her wings and torso in different directions so that the lower wings do not sink too much under the upper ones. In general, it was originally planned that way, so that the upper wings slightly overlap the lower wings, they will not be next to each other, but this overlap still needs to be corrected.
That's all!
We got such a beautiful butterfly:


In this master class, I want to show you how to weave a bright and beautiful butterfly brooch using the macrame technique.
I think this master class will be useful primarily for those who already know the basics of macrame, but would like to learn something new for themselves in this technique. This product has many interesting weaving elements and non-standard pattern steps.
There were a lot of step-by-step photos of the process, therefore, in order not to overload the master class, I decided to break it into two parts. In the near future I will publish the second, final part.
So let's get started.
To create a butterfly, we need:
Black waxed thread 0.8 mm - 3.5 m;
Red waxed thread 0.8 mm - 5 m;
Black faceted beads 4 mm - 14 pcs.;
Red beads 3mm;
Brooch pin.
Tools: scissors, pins, lighter
I know that macrame masters sometimes use different devices for weaving, someone just weaves on their knees, also sometimes they use a paper clip, but I use the classic option - a foam cushion covered with fabric and pins.
So, we begin to weave the left upper wing of our butterfly.
To do this, we cut 5 red threads of 40 cm each and 2 black threads of 40 cm as well.
1. We fold each thread in half and attach their middle with pins. We got 12 ends of the thread.

2. Now we take the second thread on the right and weave a row of 10 rep knots on it.

3. Now we take the black thread with which the last knot of the row has just been tied, and we tie another rep knot with it, the working thread of which looks to the left.

4. Now we tie another rep knot with the same thread, the working thread of which looks to the right.

5. Now again with the same thread we tie a rep knot, the working thread of which looks to the left.

Such an element of three nodes (actions 3 -5 ), woven with one working thread on one warp thread, I call it a “three-knot curl” and in the future, in order not to add extra photos, I will show this already finished element in the right places of weaving.
6. Now we string a bead on the 3rd thread on the left.

7. Weave two rep knots on the same warp thread. On the next thread we string a bead.

8. Now, on the same warp thread, we weave 8 more rep knots.

9. Now we take the third thread on the left as the base and tie 2 rep knots on it.

10. After, weave a curl into three knots and string a bead on the next thread.

11. On the same warp thread, we tie one rep knot with a thread coming from the bead and string a red bead on the adjacent thread.

12. Weave 7 more rep knots on the same warp thread.

13. Now repeat the steps exactly 9 -10 .

14. On the next thread we string a bead.

15. Now, on the right side of weaving, we take the first red thread as a warp and weave a row of 6 rep knots on it.

16. Now we tie another rep knot with the working thread of the last knot.

17. We string a red bead on the thread following the knot.

18. After, on the same warp thread we weave a row of five rep knots.

19. Now back to the left (black) part of the wing. We take the thread that served as the basis of the curl and weave a row of 7 rep knots on it.

20. Now we take the first thread on the left as a basis. With the second thread we tie a curl into three knots on it.

21. We string a bead on the thread closest to the curl.

22. We tie one rep knot with this thread on the same warp thread. On the next thread we string a bead.

23. Weave a row of 5 rep knots on the same warp thread.

24. Now we take the first red thread on the right as a base and weave a row of 5 rep knots on it.

25. Now, on the same warp thread, we weave a row of 5 rep knots, but in the opposite direction.

26. Now we take as a basis the first thread on the left (black) and weave a row of 5 rep knots on it.

27. Now we take the warp thread (black), on which the row has just been woven, and using it as a working thread, we tie 6 rep knots on the warp threads that we have left on the right side of the wing.

This completes the first wing.
Now we weave the right wing according to exactly the same pattern, with only one difference, we need to mirror the original location of the black and red threads and the direction of all knots in a mirror order.
Here are the two finished upper wings of our butterfly:

It's starting to look like a butterfly, isn't it?

In the second part of this master class, I will show how the lower wings and body of a butterfly are woven, as well as the final assembly of the parts and turning them into a full-fledged butterfly :)
Work PlotkoKatia
For a butterfly, 10 threads are cut 1.5 m long. Weaving starts from the head.
Butterfly weaving using macrame technique
Two threads, each separately, are bent in half, at the bend points they are attached to the base with pins. From every two threads, a zigzag lace is woven with 25 knots.
Both laces form a mustache. Then all 4 threads are connected, weave 7 flat knots and form a bump - a head. The threads are again divided in half and 9 double loops are woven on each side of the head. To weave the right eye, the thread is held with the left hand, and loops are thrown with the right, then a circle is formed. At the head, the circle is fixed with a simple knot, wrapping threads around the base of the circle. Similarly weave a circle on the left side. In the continuation of the head, a rhombus is woven from 5 zigzag loops.

wings. The thread is folded in half and the folds are pinned to the base with pins. 3 double loops are formed on the thread and 3 more threads are attached to this thread.

Then weave a diagonal brid on top. Next, the outer edge of the lower wing is woven - on the second thread from above, 3 double loops are formed with the first thread and the next one is woven towards the base of the previous brida. This operation is repeated 2 more times. Then one brid is weaved nearby, the first three threads are directed down, the next threads are gradually attached to the weaving base.
At the end, 5 double loops are made on 4 warp threads, forming a semicircle. Brida is woven from the semicircle. First, on 4 warp threads, then on 3, 2, 1st, then 3 remaining threads are attached.

At the end weave 2 double loops. Brodu is woven from the semicircle to the outer edge. They finish the brid with 3 double loops and form the next brid by weaving each thread with three rep knots. At the end weave 4 double loops. The 4th brid is woven with each thread forming 4 rep knots. They finish with 5 double loops and the last brida is woven with 4 rep knots with each thread. Weave 5 double loops. In conclusion, they form a long brood, gradually attach the remaining loops to the base.
When the central brid reaches the semicircle, one thread is wrapped around the semicircle and on this thread all the central threads are woven with rep knots, attaching 2 threads of the head to them.
Similarly, weave a wing on the other side.

In the next row, again, a semicircle is wrapped around with an extreme thread and, based on this thread, a brida is woven to the center. So do 4 brids. Then they continue to weave the body of the butterfly with brids to the center, leaving 1 thread in each row. Weave until 2 strands remain at the end. Then weave 1 bride on the left threads.
Cut the remaining threads and hem or glue on the wrong side.

To create macrame butterflies, you will need nylon threads and aniline paint. Coloring is done like this - hot water is poured into a small vessel, dyes are placed in it, and then the macrame butterfly is painted with a brush. It is necessary to paint the lighter places first, and then the dark ones.
Macramé butterfly making
To weave one butterfly, you need to cut 10 nylon threads into segments of one and a half meters. The head goes first.
Take two threads, and bend them one by one in the middle. Fix the resulting bending points with studs to the base.

Next, take 4 threads, group them, and make 7 small knots that form the head.
After that, the resulting twine is divided in two. From both ends make 9 paired loops.

To weave an eye, it is necessary to hold the thread with one hand, and string loops with the other, which later form a circle with loops located in the middle. The resulting eye is attached to the head by wrapping it with threads on both sides. The resulting eyes are fixed with hairpins to the head.
Next, you need to weave a rhombus that will continue the head. Take 4 threads, and combine them with paired small knots. After that, the threads are divided in two and next, in all pairs, brids are made, which consist of three paired loops. Open the resulting rhombus, and place exactly the bases. Then it is necessary to close the rhombus with three paired loops, and the rhombus itself is fixed with a paired small knot. Set the completed head aside.
The next step is to make the wings. They run parallel to each other. To do this, you need to bend two threads in half. The bending points are fixed with studs to the base, close to one from the other. Then you need to make three paired loops on them, then tie three more paired threads to each.

Then they make a straight brid. To do this, a thread is taken from above as a base and all the remaining threads are braided to its edge along with the base of the previous brida.
After that, they move on to weaving the wing, namely to its lower part. In order to do this, take the second upper thread, and make three paired loops on it with the first thread. Brida weaving is made in the direction of the previous warp. There are two such procedures. Then another brid is knitted, using the first three threads, successively connecting subsequent threads to the base in the process of weaving. Next weave a half ring. It is necessary to connect large and small wings. To do this, it is necessary to weave 5 paired loops on four base threads. The next step is to make the bridles directed horizontally to the sides from the half ring. Then they take 3 unoccupied threads from the previous brida, weave them into four base threads, and weave by reducing the base threads.

It is necessary to weave until the last thread remains, on which 2 paired loops are weaved, after which large wings are made.
After weaving the second paired brida, it is completed with 3 paired loops. Brida following is made by interlacing each thread with 3 rep knots. After that, the end is fixed with pins to the frame, and four paired loops are made. The weaving of the 4th brid is made with 4 rapeseed knots from the half ring. The completion of the fifth is done with paired loops. The final brid is made with four rapeseed knots using the remaining threads. Then, weave five paired loops. Then they do the same only in reverse. Finally, make a long base of the wing. This is done by the brida, but there is also the possibility of doing it with the spiral method. After that, wrap the half ring from top to bottom. After that, you need to attach the head and the threads located in the center to this thread with rapeseed knots. The second wing is woven in the same way. Weaving the back of a butterfly is done in brids towards the center.

Weaving continues until only two threads remain, which must be directed to the center, and the final brids are made from the remaining threads. Behind the butterfly, using the threads that are left, make a cross in order to attach the butterfly to the outfit. To do this, you need to make three paired loops on each side.

Then, on 2 central threads in each side, 3 paired loops are made, after which, these halves are connected and 3 paired small knots are made. Then the threads are bent and two paired loops are made. In conclusion, vertical bridles are made with free threads on all threads. At the end, you need to cut the threads. To do this, with one thread, three loops are made from all sides, and the parts are connected, 3 paired small knots are woven. Again, the threads are divided in two, and two paired loops are made. At the end, they make brids using free threads from the back, tie them up and cut off the excess.

")


 Interpretation of the Gospel B")