Using nautical knots in macrame. Macrame. The main stages of weaving and terms. Flat knot. Rhombus from square knots
Greetings!
I continue our course on tying the basic knots in macrame. Today we will learn how to weave: a double flat (square) knot.
This is one of the main knots of weaving. It has other names: double half-knot, square and the most common name, clasping. Hunters call him a game or hunting.
Making a square knot
Fasten two threads 1 m long on the base, skipping the ends by 20 and 80 cm.
double flat node with the right crossbar.
1. Weave the right single flat knot first. Figure 1, some photos are being processed, sorry for some temporary inconvenience.
Weaving the right single flat knot
Single right flat knot.
Training task: Cut 2 threads 1 m long, each fold in half so that one end is 4 times longer than the other (20 cm knotted thread and 80 cm working thread) and fasten them to the base, (with a lock towards you) placing the short ends in the middle and long at the ends. It turned out 4 threads: medium 2 - nodular; extreme 2 - workers.
Execution sequence single right flat knot.
- Start the right knot with the right working thread (4th). in photo 1 it is red.
- Take it in your right hand, bend the thread at a right angle, put it over two stretched knots and put it under the left working thread (1st - Fig. 1)
- With your left hand, bring the 1st thread under both knots and pull it over the 4th thread.
- The node is ready. But this is only half of the square knot.
We will begin to tie the second half of the square knot on the left in a mirror image.
Execution sequence single left flat knot.
- Take in left hand left thread, bend it at a right angle and put it on top of two knots (2nd and 3rd)
- Now, with your right hand, put the right working thread (4th) on top of the 1st thread and bring it under both knots.
- Next, pull the 4th thread with your left hand over the 1st thread from the loop formed between the nodular thread and the 1st thread.
- Pull the left and right working threads in opposite directions at the same time - the knot is tightened.
Attention! At the moment of tightening, it is necessary to pull the knotted threads tightly: put them on top of the middle finger of the left hand and squeeze between the ring and little fingers (Step 3).
It turned out double flat knot or square knot. Crossbar on the right. Pay special attention to this. Since when weaving products, in books, the author sometimes writes when it is necessary to weave a square knot with a right or left crossbar.
Tighten it and look carefully: a vertical crossbar is visible on the right - this is a sign of a finished knot. If you started weaving from the left single flat knot, then it would turn out to be on the left.
There is no fundamental difference in nodes.
Attention! Remember, start a new knot with the working thread that comes out from under the crossbar of the previous knot. In this picture, this is the right red thread. So, I would start weaving the next knot on the right side, that is, the right single flat knot.
And here is a video tutorial on how to do a (square) double flat knot.
Of the hundreds of knots familiar to people from ancient times, not so many are used in macrame. Lucky only the most beautiful, as well as simple, but very necessary for weaving a variety of chains and nets. Most often, grids and chains create a calm, monotonous background, and the main composition of the knots is perfectly readable on it.
SIMPLE KNOT- this is our old friend "knot for memory". In the literature on needlework, several names for a simple knot are mentioned: looped, round, finger, ordinary, knot "through the hand." One of the most ancient names is "kalach", given to him for his resemblance to a bread roll. This knot is a symbol of a good harvest and a well-fed life.
Left simple knot. Cut the rope 30-40 cm long and pin one end to the pillow. Take the rope in your right hand and pull it slightly. With your left hand, take the free end of the rope and put it over the stretched one from left to right. Insert the end of the rope into the loop formed and tighten. The knot will be tied where you hold the rope with your right hand.
Right simple knot. The loop for the right knot is formed to the right of the stretched rope, so pull it with your left hand, and tie the knot with your right.
When making knots, the thread can be started not only from the front, but also from the wrong side.

NODE "CAPUCHIN". The ancient inhabitants of Peru - the Incas - used this knot in the knot letter (kipu). The beautiful shape of the knot and expressive texture have made it popular in decorative modern weaving. Consider two ways to tie this knot.
Method 1. Pin a half-meter rope to the pillow and take it with your right hand, given that the finished knot will be located much lower than this place. Pull the rope lightly and with your left hand form a loop on the left, as when tying a left simple knot. With your left hand, pinch the intersection of the threads, and with your right hand wrap the right side with the free end 3-4 times. Take the free end in your right hand, remove your left hand from the intersection and place just above the knot. With a sharp movement, pull the rope in opposite directions - transverse turns are formed on the rope - this is the Capuchin knot.
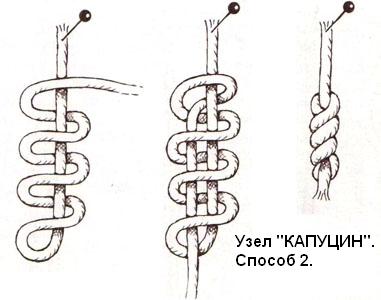
Method 2. This method is more difficult, but the knot is clearer, without vertical crossbars. Pin a 50 cm rope to the pillow, form a loop on the left, as in the left simple knot. Hold the intersection of the threads with your left hand and pull the rope. Take the end of the rope in your right hand and wrap it around the stretched rope very loosely from left to right. Next, pass the end inside the coils to the left of the stretched rope and then from below into the fixed loop. Now remove your left hand, and pull the free end with your right hand. 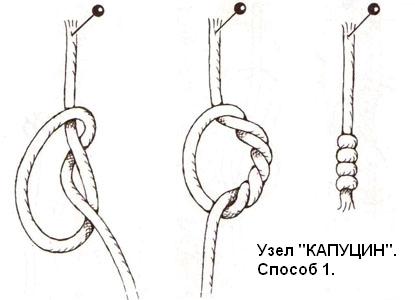
NODE "EIGHT". This knot also came to us from an ancient nodular charter.
Attach the rope to the pillow. Take the middle part of the rope in your right hand, its lower end in your left hand and wind it from left to right on the middle part of the rope - a loop has formed on the left. Now go around this middle part of the thread and lower it from above into the loop. Holding the middle part of the thread with your right hand, pull the lower end with your left hand - the knot is ready.

Knots from two threads.
With further acquaintance with the nodes, the terms will be encountered: nodular and working thread. The thread around which the knots are tied is called a knot or warp, and the thread that they work with is called a working or braiding (protracted). The functions of the threads may change during the weaving of the pattern, in which case their names also change.
The knotted thread during weaving is shortened more slowly than the working thread. In the figures, the knotted thread is highlighted darker.
TIE KNOT (Slovak or fastening). Fold a 50 cm long rope in half and fasten it to the base. Pull the left thread (knotted) with your right hand, right thread(working) put your left hand across the nodular one and hold the intersection of the two threads with your right hand. With your left hand, wind the working thread under both ends, free your right hand, take the working thread with it and pull it from top to bottom into the loop formed. Pulling on both ends, tighten the knot. Similarly, the knot can be made with the left thread. 
ARMENIAN KNOT. This node also has the names "cam", "prefabricated", "sliding". It is performed similarly to the tie knot, with the only difference being that the work begins with the "right simple knot". 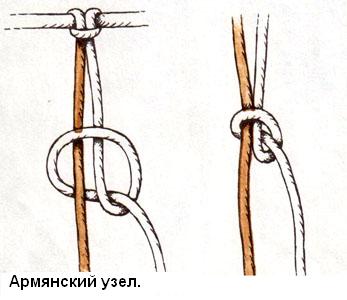
HINGE KNOT. Other names for this knot: "horizontal" or "knot in a circle." Depending on which thread is chosen as the working one - left or right, the node can be left or right. Usually the left knots are tied with the left hand, the knot is pulled with the right. And vice versa, the right knots are tied with the right hand, the knot is pulled with the left. Externally, the nodes do not differ from each other: one is a mirror image of the other. When weaving with looped knots, the working threads should be 4-5 times longer than the nodular ones.
- LEFT HINGE knot. Fasten a rope 80 cm long to the base: the right end is 20 cm long, the left end is 60 cm. Pull the right (knotted) thread with your right hand. With your left hand, put the left thread (working) on the right stretched thread, go around it and pull the working thread from under the knot. Slide the knot up the knot thread and tighten it. If you weave several knots, you get a chain of knots that twists into a spiral. If a chain of such knots is woven not on one knotted thread, but on a few more, then it will become more prominent (in Fig. d). 
- The RIGHT LOOP knot is performed similarly to the left loop knot, with the only difference being that the length and functions of the knotted and working threads change with each other. The left thread in the left hand is knotted, the right thread in the right hand is working. 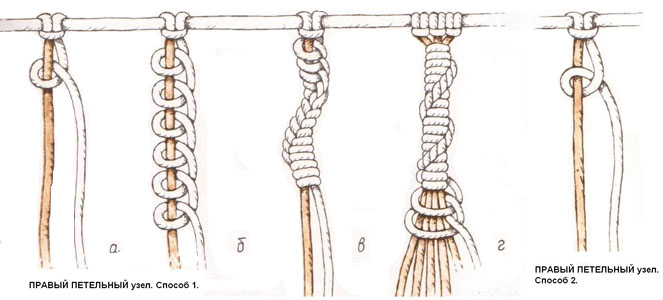
NODE "FRIVOLITE". This is the name of the knot, which came from the ancient needlework tatting, or shuttle lace. One tatting knot consists of two "loop knots". When weaving "tatting", the working threads should be 8-10 times longer than the nodular ones.
- LEFT node "FRIVOLITE". To make a knot, fasten a meter thread on the base: the right end 20 cm long is a knotted thread, and the left 80 cm is a working thread. Pull the knotted thread with your right hand, with the working thread with your left hand, perform the “left loop knot” in method 1. Bring the working thread under the knot and perform the “left loop knot” one more time, but in method 2. A vertical crossbar is formed to the left of the knot thread, and on the nodular thread - two horizontal crossbars. The node is ready. If the knots are weaved close to each other, a chain is formed with a slight bend to the left. 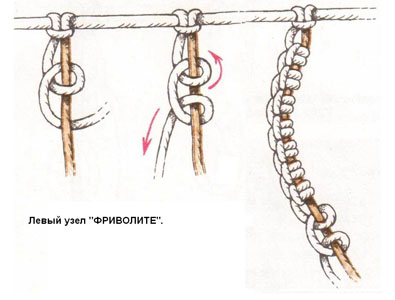
- The RIGHT knot "FRIVOLITE" is performed similarly to the left, but from two "right loop knots": in the left hand - the left nodular thread, in the right hand - the right working thread. The finished chain bends to the right. 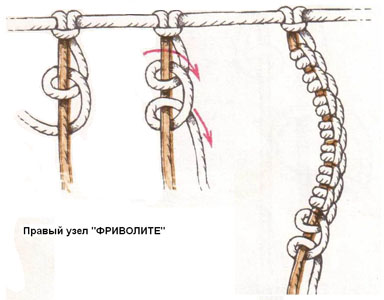
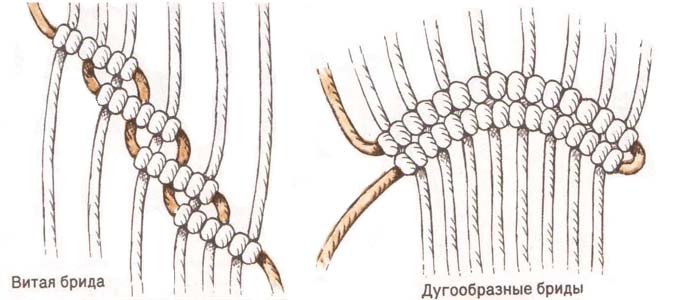
REP KNOT- one of the most popular macrame knots. It consists of two loop knots. In ancient books, it was called ribbed, ribbed, convex, double. The surface of the web of rep knots consists of convex scars (like rep). In weaving they are called brids. Brida is a series of rep knots that fit snugly together on a knotted thread. Brides can be horizontal, vertical, oblique (diagonal) or curly (wavy, round, spiral). The rep knot is called horizontal, vertical or diagonal, depending on the position of the knot thread when weaving. It is woven with the left hand if working from left to right, or with the right hand if from right to left. When weaving rep knots, the working threads should be 4-5 times longer than the nodular ones.
- HORIZONTAL REPS knot. Fasten on the basis of 4 threads 1 m long each, folded in half. Let's perform a brid from left to right: put the leftmost thread - knotted - horizontally from left to right on top of all the others - workers. Pin the fold of the knotted thread with a pin and pull it with your right hand (in Fig. a). Take the adjacent thread with your left hand, throw it over the knotted one to the left and pull it out from below (in Fig. b). To finish the knot, turn the same working thread up, throw it over the knotted one and pull it through the loop formed. We made two loop knots. Pull them towards each other - the rep knot is ready (in Fig. c, d). Tie the following knots alternately with each subsequent working thread. The first horizontal brid is formed (in Fig. e).
Weave the second brid from right to left. Turn the knotted thread to the left, fasten the turn, place the thread strictly horizontally over the working threads. Now weave with the right hand, and with the left we pull the knotted thread. Take the extreme working thread with your right hand, throw it to the right through the knot and pull it down. Repeat the same action again (in Fig. d), tighten tightly. Weave the row to the end. 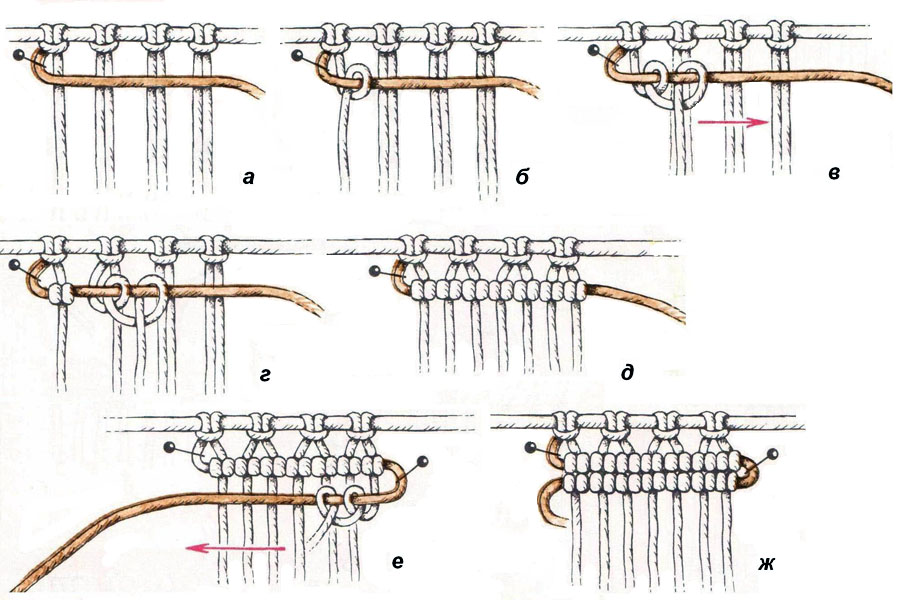
In order for the brids to be even and strong, they are sometimes woven on a double knotted thread. Lay two extreme opposite threads on top of each other (double nodular) and place them on top of the rest. Perform the brid from right to left or from left to right. 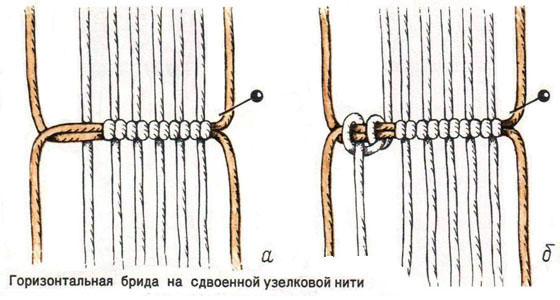
Horizontal breeches decorate and compact the typesetting. Sometimes they put an additional thread of the same length as the warp thread (in Fig. c). 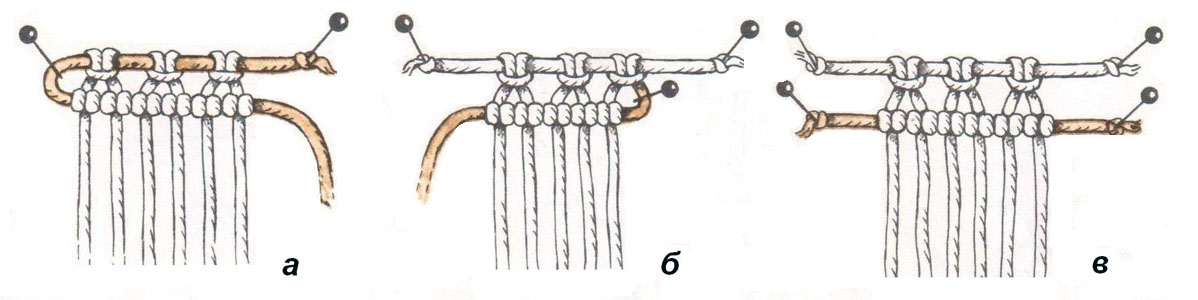
If the knotted thread runs out during operation, it can be increased (in Fig. a). So that the brid at the place of extension is not thickened, tighten the knots in this place more tightly.
The working thread can also be increased, if necessary (in Fig. b). Attach the end of the new working thread to the knotted thread, and on the thickened knotted thread, make rep knots to the point where the working thread breaks. The working thread can be fixed in another way (in Fig. c) 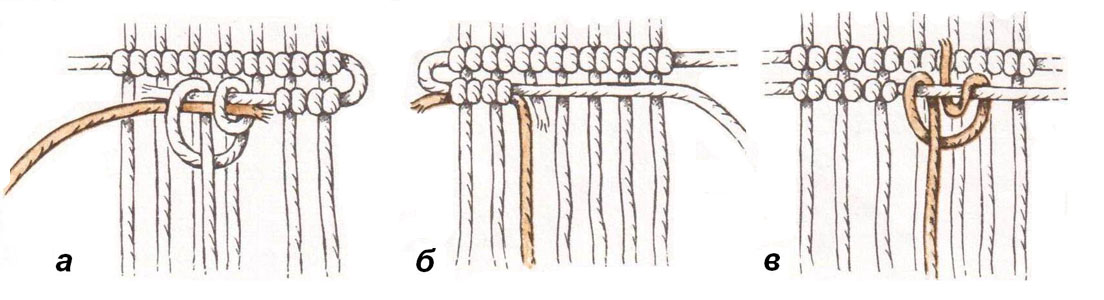
DIAGONAL REP knot. This is a rep knot tied on an obliquely stretched knotted thread. Knots are always woven from top to bottom on an oblique line. An infinite number of patterns can be made from inclined brids: rhombuses, zigzags, openwork flowers and leaves. To complete the pattern without distorting it, place paper or fabric with a pattern pattern under the weaving and lay out a knotted thread along it. 
Diagonal brids, tilted to the right, can be woven parallel to each other, each new row starting from the leftmost knotted thread. For a left-leaning brid, take the knotted threads from the right edge. 
VERTICAL REP knot. This is a rep knot tied on a vertically stretched knotted thread. As a rule, the working thread in this case is not hung on the warp, but is stabbed to the side with a pin. Only knotted threads are fixed on the base. Knots are woven, moving horizontally. This technique is similar to the tapestry technique. The fabric will be dense and inelastic.
Attach to the base 3 threads of 50 cm, folded in half. Pin a thread 1 m long with a pin under the base to the left of the hanging threads. Weave the brid from left to right. Pull the leftmost knotted thread with your left hand, weave with a working thread with your right hand. Tie the first rep knot with a working thread, moving it close to the warp. With the same working thread, tie knots alternately on the remaining knotted threads. A horizontal brid was formed from vertical rep knots. Next, weave from right to left, changing the work of the right hand to the left.
If the working thread is over, it can be spliced with a new thread using method 2 on the right or left on the knotted thread, depending on which side the end of the old working thread remains on. The rest of the thread is hidden on the wrong side. 

TRIPLE REP knot. This knot consists of three loop knots, unlike the usual rep knot, which consists of two loop knots. Horizontal (a), diagonal (b), vertical (c) knots are tied simply, another loop knot is added to the usual rep knot. 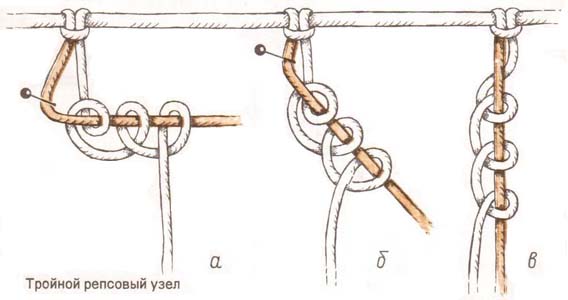
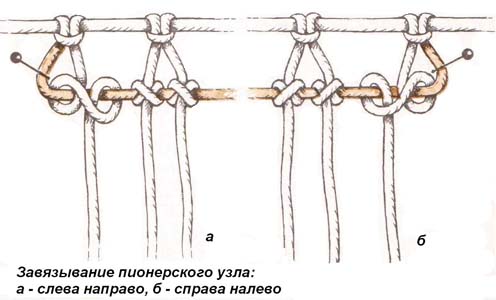
The PIONEER knot is still the same rep knot, if you look at it from the inside. A canvas made from such knots is obtained with a fine beaded texture. You can weave it with ordinary rep knots, turning the work on the wrong side, or you can perform the rep knot inside out. 
FLAT knots. The surface of the canvas, made of flat knots, is smooth and flat - hence the name of the knot. The pattern of them is the same on both sides and is therefore suitable for weaving curtains, curtains and other things that have a visible wrong side.
- HERCULES Knot. This knot, which came from antiquity, got its name from the name of the mythological hero. In maritime law, it is called a direct knot and was used to tie cables. Ancient healers used it when bandaging wounds and fractures. The Hercules knot was also used as a clasp, tying the ends of the tunic on the shoulder. Among macrame lovers, it is known as the knot of Hercules, the "hermit", flat without a base.
To perform the knot, take two threads of 50 cm and pin each end to the pillow. Place the 1st free thread (see Fig. 1) horizontally from left to right, put the 2nd thread on it, go around the 1st thread with it and lower the end of the 2nd thread down - you got half the knot (Fig. 1 a). Lay the thread number 1 horizontally from right to left, the 2nd thread on top of it, go around the 1st thread with it and lower the end of the first thread down. Now you need to tighten the knot: take the two left ends in your left hand, the two right ends in your right hand, tighten the knot, tearing your hands in opposite directions horizontally. We got a finished knot with a vertical crossbar on the left (Fig. 1 b).
If you start tying a knot from the right thread (number 2), you will get a Herculean knot with a crossbar on the right (Fig. 1 c). Strictly alternating the actions "Fig. 1 a" and then "Fig. 1 b", you will get a flat chain (Fig. 2 a), in which the right and left vertical crossbars strictly alternate. If the knots are tied after 1-2 cm, then the chain will turn out to be openwork (Fig. 2 b). If you tie one half of the knot under the other, for example "Fig. 1 a", then the chain will become twisted (Fig. 2 c).
When weaving Herculean knots, both threads are consumed evenly, and their length should be 4-5 times the length of the product. 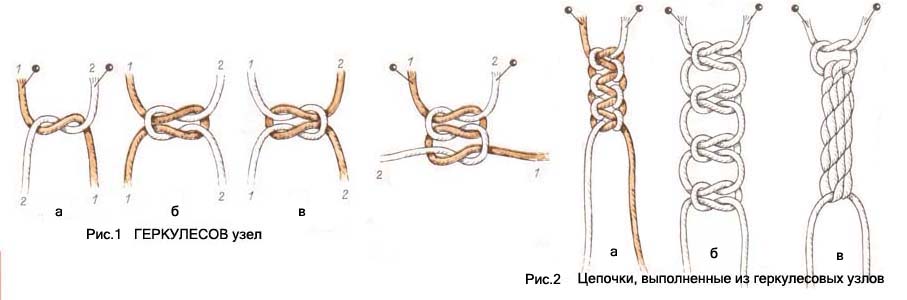
A SINGLE FLAT knot can be left or right, depending on which thread we start to weave it - left or right. When weaving chains from single flat knots, the working threads should be 6-7 times longer than the nodular ones.
SINGLE LEFT FLAT knot. Prepare two threads 1m long. Fasten the threads on the base so that the ends of the threads 2 and 3 (see Fig. a) are 4 times shorter than the ends of 1 and 4. The middle two threads (2 and 3) will be knotted, the extreme ones (1 and 4) will be working. Take the left thread with your left hand, bend the thread at a right angle and place it over the knotted threads (fig. b). With your right hand, place the (4th) right thread over the 1st thread and bring it under the knots (fig. c). Next, pull the 4th thread with your left hand over the 1st thread. Pull the working threads in opposite directions (1st and 4th) at the same time - the knot will tighten. When tightening the knot, the knotted threads should be taut (see Fig.), put the knotted threads on top of the middle finger of the hand and hold between the ring and little fingers.
Continuing to tie knots one under the other, you will see how they begin to turn with an edge to the right, turn the work to the right after the turn by 180 degrees (the working threads will change places), after that, to weave the next knot, take the working thread located on the left.
When weaving chains, keep in mind that the thicker the bundle of knotted threads, the rounder the shape of the chain. 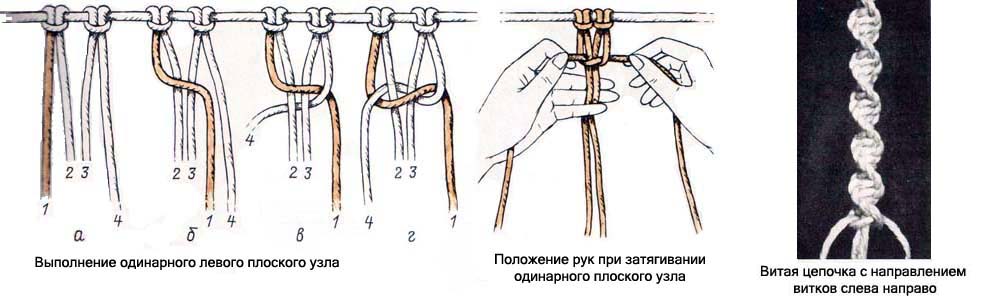
SINGLE RIGHT FLAT knot. Prepare two threads 1 m long. Fasten the threads on the base so that the ends of the threads 2 and 3 are 4 times shorter than the ends of 1 and 4. The middle two threads (2 and 3) will be knotted, the extreme ones (1 and 4) will be working. Take the right working thread with your right hand, bend the thread at a right angle and lay it over the knotted threads (Fig. a). With your left hand, place the (1st) left thread over the 4th thread and bring it under the knots. Next, pull the 1st thread with your right hand over the 4th thread. Pull the working threads in opposite directions (1st and 4th) at the same time - the knot is ready. When tightening the knot, the knotted threads must be taut.
Continuing to tie the knots one under the other, you will see how they begin to turn with an edge to the left, turn the work to the left following the turn by 180 degrees (the working threads will change places), after that, to weave the next knot, take the working thread located on the right. 
DOUBLE FLAT knot Prepare two threads 1 m long. Fasten the threads on the base so that the ends of the threads 2 and 3 are 4 times shorter than the ends of 1 and 4. The middle two threads (2 and 3) will be knotted, the extreme ones (1 and 4) - workers. First weave the left single flat knot, then the right one - we get a double flat knot. Tighten it (fig. d). On the left, a vertical crossbar is formed on the node. If you started with the right single flat knot and ended with the left, then you would have a vertical crossbar on the right. Remember, start a new knot with the working thread that comes out from under the crossbar of the previous knot. When weaving a chain of double knots, pull the knotted threads taut. 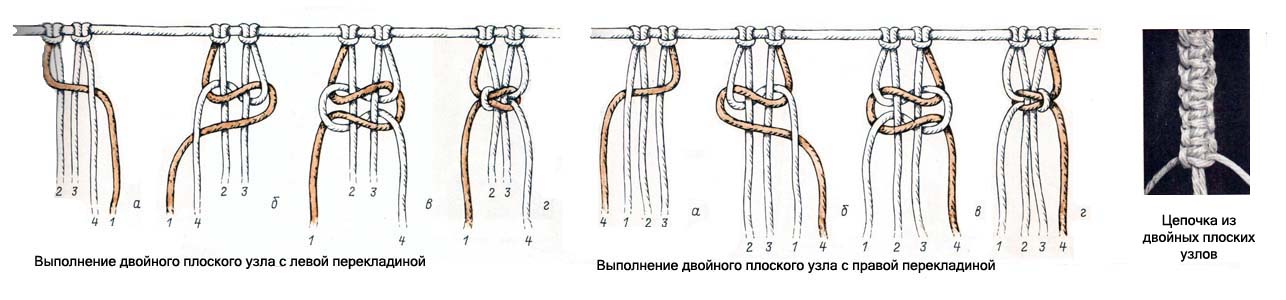
EXTENSION OF THREADS in a chain of flat knots. If two working threads run out at the same time, then tie the last knot loosely, and pull a new working thread into it behind the knotted ones (Fig. 1). Align the ends of the working thread and tighten the knot with the old working threads. These ends must be sewn to a new working thread.
If only one working thread has run out, attach the end of the new one to the old one and tighten the flat knot with a double thread (Fig. 2).
You can attach the working thread by tying it with a single (Fig. 3) or double flat knot (Fig. 4)
If the knotted thread has run out, then place the end or ends of the new threads between the short old ends (Fig. 5), continue to tie the knot. Or hang a new knotted thread folded in half with a loop on two old threads, then sew the ends of the old threads from the inside out. 
Flat knots are tied, as a rule, on the traditional number of threads - 4 (1 working, 2 nodular, 1 working: 1-2-1). If this number is violated, then the node is called common. It is tied on a different number of threads (Fig. 1)
- A flat complex knot (Fig. 2) is tied in turn: a double flat knot (1-2-1), a common knot (1-4-1), a double flat knot (1-2-1). 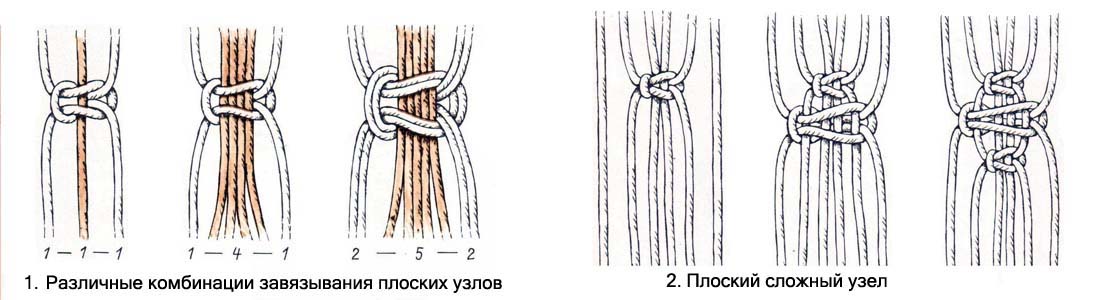
FIG Knot (crossed flat). Fasten on the basis of 2 threads 1 m long, skipping the ends by 20 and 80 cm. Take the left working thread with your left hand, bend it at a right angle and put it on top of two knots under the right working thread. With your right hand, bring the 4th thread under the 3rd, over the 1st, under the 2nd and pull it over the 1st thread. The node is ready.
We tie the next knot, again starting from the left with the leftmost thread. Do not pull knotted threads tightly (Fig. 1).
By tying fig knots, it is possible to expand or narrow the distance between the knotted threads, depending on this, various combinations of knots are obtained, for example, in the form of a leaf (Fig. 2.3).
Fig knots can be woven not only on two knotted threads, but also on more of them (Fig. 4)

The history of knot weaving dates back thousands of years. It began from the time when a person needed to connect the two ends of the thread, and he tied the first knot.
Throughout the path of development, mankind has treated nodes in different ways. There were periods when knots were simply prohibited. Among the many taboos the observance of which fell to the lot of Roman senators was the prohibition to have at least one knot on clothes.
In the East, in ancient times, there was a nodular charter, thanks to which people collected and stored the necessary information.
AT Ancient Greece at the time festivities it was proposed to untie and tie such a complex knot as "Turkish". It was a kind of competition in dexterity. The “Turkish knot” is perhaps the legendary Gordian knot, the unraveling of which, according to ancient legends, promised power over Asia.
Alexander the Great knew the legend of the lucky king of the people, and he really wanted to see the famous wagon and the ingeniously woven knot. According to some sources that have come down to us, Alexander could not unravel the Gordian knot and, drawing his sword, cut it; according to others, the king pulled out a peg, unraveled the knot and removed the yoke, which confirmed his right to be the ruler of Asia.
The heyday of macrame dates back to the 9th century BC. e. It is from this time that the origins of the creation of products from nodular weaving are visible. The founders of macrame are sailors who, during their leisure hours, weaved chains, pendants, talismans and gave them to friends in distant lands.
In the XIV century, sailors introduced the art of weaving to the inhabitants of Spain, India, and China. AT cathedral in Madrid, drawings of patterns and knots of macrame of that time were found.
At the same time, macrame became known and popular in Italy. Braided lace was used to decorate bedspreads, curtains, and clothes.
Macrame products were also reflected in their canvases by artists. One of the first to do this was Sandro Botticelli. In the painting The Adoration of the Magi (1476-1477), one of the characters is wearing a macramé cap.
In the 17th century, macrame spread from Italy to Northern Europe and North America. Then it became very popular in England. In those days, many European fashionistas decorated their clothes with knotted lace.
Very few masters have mastered the art of weaving at all times. They created beautiful examples of wickerwork: curtains, bedspreads, covers for musical instruments. Lace, which they wove from golden threads, adorned the clothes of kings and priests.
No matter how long the art of weaving was forgotten, it revived with renewed vigor and not only acquired new features, but also changed its name. At different times, the art of weaving was called square weaving, nodular lace, nodular fringe. And only in the XIX century this type of needlework, crafts and arts began to be called macrame. Translated from Turkish, “macrame” is a scarf or napkin with a fringe, translated from Arabic, “migramah” is a fringe or scarf decorated with woven lace.
A new wave of macrame revival began in the 19th century. Samples of wickerwork of that time, stored in various museums around the world, are made mainly on the basis of a horizontal knot (rep or double) in all variations: rhombuses, chains, corners, cells. A variety of materials were then used for weaving: silk and cotton threads, silk lace, gold thread, wool.
Since the 20s of the 20th century, macrame has been reborn and has become fashionable. Wicker products: carpets, napkins, lampshades, screens, and later curtains, planters - began to decorate rooms. Wicker panels began to be combined with weaving. Macrame has found wide application in the creation of such items as a rocking chair, a hammock, a gazebo. Now the possibilities of macrame have expanded even more.
What will you need
Tools
Tools for weaving macrame will need a little, moreover, they are all simple:
pillow for weaving;
pins with large heads;
scissors;
tape measure;
crochet hooks, thin and thick, for pulling threads in complex patterns;
a knitting needle or an awl, necessary when untying improperly tightened knots;
weights for pulling and leveling wickerwork.
Sometimes small clamps are required - a vise-type device.
Pillow. Working base for weaving - a stable, moderately hard pillow. The more convenient this tool, the faster the work goes.
There are as many varieties of pillows as there are substitutes for it. Instead of the old traditional pillow with clamps stuffed with sawdust or sand (they were still weighted with a piece of lead), now they use a board made of foam or soft wood. A piece of plywood or thick cardboard measuring 20 x 40, 30 x 40, 30 x 50 cm is also suitable. A layer of foam rubber, felt or cotton wool 5–6 cm thick is placed on it and covered with dark cloth, plain satin or soft checkered fabric. If the fabric is thin, put an oilcloth.
The most comfortable pillow with a slight slope. To make the pillow stable, it can be fixed to the table with clamps. Some people like to work with a cylinder-shaped pillow (diameter 12–15 cm, length 30–40 cm). It can be replaced with a roller from upholstered furniture, fixing such a base in a box or on special goats.
Finally, you can use the back of an easy chair or armchair.
Pins. During weaving, they are always kept at hand, injected into the edges of the pillow. They fix individual nodes and fragments of the product and give the desired shape to the woven fabric. The pins should be long enough not to get lost in the fabric, and strong enough not to bend. Ordinary short tailor's pins with small heads are not suitable; decorative pins with plastic heads are needed for weaving.
Strong pins with beautiful bright heads can be made by yourself. To do this, take 10 sewing needles or large darning needles, as well as plastic balls, beads or mosaic chips. Heat the eye of the needle on the fire and quickly pierce the ball with it to the middle, leave the needle on it and let it cool.
Weights. They will be needed in order to delay the parts of weaving tied to them that are not involved in the work. Weights can be made from improvised materials: depending on the size of the product and the length of the threads, they can be large (for example, a plastic bottle of water) or small (you can take an ordinary onion by tying it with a thread).
materials
Threads and ropes for weaving macrame use a wide variety of: linen, hemp, cotton, sisal. Small things are woven from harsh threads, cord fishing line, floss, "iris", soutache. For large items, a clothesline, paper twine, curtain cord are suitable.
The stronger the threads are twisted, the more they are suitable for weaving: the knots are clear, embossed, the products from them are not deformed. Weakly twisted fleecy threads in the process of work can become shaggy, and then the knots from them are obtained with an inexpressive texture - the pile “blurs” it.
Weaving from hard, coarse ropes is difficult and unpleasant, but if you put on thin knitted gloves, it will become much easier to work.
Too stiff threads made from natural fibers can be boiled before weaving: they will become softer and more elastic.
Additional stiffness can be given to soft threads using a special solution: 25 g of gelatin is soaked in 0.5 liters of cold water. When it swells, the dishes are placed in a pot of hot water and heated until all the gelatin is dissolved. Then stop heating, add 1/2 teaspoon of glycerin, 1 liter of hot water to the solution and mix thoroughly. Dry threads are immersed in the solution for several minutes, removed and dried. Knots from such threads are much more beautiful than from soft ones.
It is difficult to work with threads that have a slippery surface. These are synthetic straws, silk cords, nylon fishing line, polypropylene. The knots of them are untied, and therefore they should be tightened as tight as possible.
Weaving paper twine or silk thread is easier if you moisten your hands with water from time to time.
If you decide to weave from woolen yarn, then it should be thick, durable and tightly twisted.
The ends of silky threads are untwisted during work, therefore, before weaving, they are smeared with glue or knots are tied on them, and for synthetic threads, the ends are melted over the fire.
Fringe for napkins, tablecloths and towels is sometimes woven from the threads of the same product, after pulling out the weft or warp.
The most beautiful knots with an expressive texture are obtained from threads with a round section. The same knots made of flat braid look less interesting.
And a few more tips. Do not refuse to work with uneven coarse threads. Thread defects will become less noticeable after ironing the finished product. Iron like this: put the work wrong side up on a soft bedding, cover with two or three layers of wet gauze and lightly apply a hot iron, being careful not to knock the knots under the gauze. When the gauze becomes slightly damp, remove it and leave the product to dry without gauze.
Wicker products can be washed gently, but must not be twisted. After washing, the thing is wrapped in a towel or cloth to remove excess moisture, then dried a little, straightened, and then steamed.
If you are really fond of macrame, you will need a lot of things, at first glance, completely unnecessary: old beads, various metal and wooden rings and hoops, balls, strips, slats, wooden knuckles from accounts, decorative buttons and buckles, toy pyramids, old picture frames and lampshade frames, bizarrely shaped vessels and much, much more.
Weaving technique
Typesetting row
A set row is a certain number of threads (ends) hung on the base from which work begins. There are several ways to hang (attach) threads. Let's look at four of the most common.
For training, it is better to use thick light threads with a diameter of 3-4 mm or a clothesline. You will need four threads of 20 cm each. For the base, take a thread of a different color 30-40 cm long. Pull the base tightly and fasten it horizontally on the pillow with pins, sticking them at an acute angle into the ends of the base. Hang all four threads in different ways.
Method 1Fold the yarn in half, place it on the warp with the loop up, fold the loop back over the warp, thread the two ends through the loop and tighten it by pulling both ends down. The horizontal bar of the loop was on the front side of the set.
Method 2Fold the next yarn in half, loop up under the warp, fold the loop forward over the warp, thread the two ends through the loop and tighten by pulling both ends down. The crossbar remained on the wrong side.
 Method 3
 It has several names: extended or stretched mount, double hitch. The typesetting row, made by method 3, turns out to be more dense, the base does not shine through it.
First, fasten the thread folded in half using method 2, then separately with each end, perform one turn: throw the end over the base, go around it and pull it over the loop formed from below. The crossbars were left on the wrong side.

The typesetting row made in method 3 will be even denser if more turns are made at each end (crossbars on the wrong side).
The same set is also performed in such a way that the crossbars of the nodes are on the front side of the set, but such a set looks less neat.
Method 4It is used when it is necessary to attach only one end of the thread to the base.
Place the upper end of the thread under the base and fix it with a pin at a distance of 2-3 cm above the base. Throw the lower end on the base to the right of the upper one and go around it - you get the first turn; tighten it by pulling the thread down. Make the second turn to the left of the upper end: again throw the lower end onto the base, go around it and pull the thread into the loop formed from below under the base. Tighten the second turn - the knot is ready. He securely attached the thread to the warp.

Often, when hanging threads, you have to combine different ways fastening, for example, when hanging colored threads or threads of different lengths in a certain order.
So, to fasten two threads using methods 3 and 2, first fasten one thread using method 3, leaving a gap in the middle part of the fastening, where the second thread is fastened using method 2. The crossbars of the loops remain behind the warp.

Main knots
hercules knotThis is the first and main macrame knot, it is also called Herculean knot. Let's try to tie it.
Lay two threads of 10 cm vertically on the pillow. Secure the end of each of them with a pin. Bring the right thread under the left, and the left thread from the bottom up and into the loop. Now lay the right thread on the left, and the left - from top to bottom and into the loop. Tighten the resulting knot.
 First flat knot
 Strengthen two threads on the base using method 1. You have four ends. Distribute the threads in the same way as it is done in the picture: threads 1 and 4 are working, and threads 2 and 3 are the warp.

So, when weaving, we are dealing with two types of warps: a warp for attaching threads (horizontal thread) and a warp for tightening knots (threads 2 and 3). Threads 1 and 4 - workers, or weaving threads; strands 2 and 3 - warp threads, or nodular. This position must be firmly grasped.
We start weaving the first flat knot.
With your right hand, take the right working thread and bring it to the warp and under the left working thread.
Now, with your left hand, take the left working thread and bring it under the warp and from below into the loop formed between the warp and the right working thread. You have tied your first flat knot.
Based on this knot, you can weave left hand twisted chain. Continue working on the pattern you started: tie the first three more flat knots. Look closely at the sample. Did you notice that the group of nodules turned slightly to the left? Turn your pattern 180 degrees to the left and work the first four flat knots, then turn the work 180 degrees to the left again and work the first four flat knots again. Continuing in this way weaving, you will get a left-handed twisted chain.

When executing the chain, make sure that the base is not visible in it. Then she will look beautiful. Secure the sample with pins at each turn.
Second flat knotFasten two threads to the base. With your right hand, take the right working thread and bring it under the warp and onto the left working thread. With your left hand, take the left working thread, lay it on the warp and insert it from above into the loop formed between the warp and the right working thread. You have tied a second flat knot.
Based on this knot, you can weave a right-handed twisted chain. Continue working on the pattern you started: tie three more second flat knots. Look carefully at the sample: the group of nodules turned slightly to the right. Rotate your sample 180 degrees to the right and weave another four or five second flat knots, then rotate the work 180 degrees to the right again, so continue on. You have received a right-handed twisted chain.

Square knot (flat)
Fasten two threads to the base. Tie the first flat knot and immediately below it the second flat knot.
The combination of the first and second flat knots gives a new knot - a square one. A sign of the completeness of the square knot is the lock on the right.
However, the lock can also be obtained on the left if you first tie the second flat knot, and then the first.
Based on the square knot, several other knots and patterns can be made.
Chain of square knotsTie the first flat knot, under it - the second. You have a square knot with a lock on the right. So, alternating the knot with the lock on the left with the knot with the lock on the right, weave a chain of square knots.

The number of square knots in the chain can be counted by locks.
Pico in a chain of square knotsBetween the square knots in the chain, you can make large beautiful loops - pico. It gives the product airiness.
Fasten two double threads to the base, and the side threads (workers) should be twice as long as the inner threads (warp threads).

Tie one square knot. Then take a piece of cardboard 2 cm wide (the cardboard will be a template for the pico so that they are all the same height), attach it to the threads under the square knot and tie another square knot. Remove the cardboard. The threads between the knots were left untied. Now, holding the base, pull the knots up. Loose threads form loops - this is picot.
Pico size can be made different. Choose it at will, taking into account the thickness of the thread and the pattern of the chain.
Common square knot
In an ordinary square knot, there are two warp threads and two workers - one on each side. Conventionally, this is written as follows: 1 x 2 x 1. In a common square knot, the ratio of the number of warp threads and working threads may be different, and it depends on the nature of the pattern, for example, 2 x 2 x 2; 1 x 1 x 1; 2 x 3 x 2. What do these numbers mean? The middle multiplier shows the number of warp threads, the extreme ones show the number of working threads on each side.

Common square knots (left to right): lock right, lock left, double
Pattern "Gourmet"
This pattern consists of three flat knots, or a square knot plus one flat knot.
Fasten two threads to the base. The extreme threads are working, the middle threads are the warps. Tie flat knots in this order.

First flat knot: Put the right working thread on the warp and bring it under the left working thread, then the left working thread - under the warp and into the loop of the right thread. While holding the base, carefully tighten the knot.
Second flat knot: bring the right working thread under the warp and put it on the left working thread, then the left working thread on the warp and in the loop of the right thread. While holding the base, carefully tighten the knot.
And tie the first flat knot again.
Pattern "Berry", or "Bump"Reinforce two threads on the base using the uneven fastening technique. Weave a chain of three square knots. Now take the warp threads, lift them up and pull them through the base of the first square knot to the wrong side. Lower the warp threads down and, laying them in place, pull them up so that the third square knot lies on the first. Secure the "berry" with a square knot.
 Pattern "Chameleon"
 Fasten two threads to the base and tie one square knot. Now swap the warp and working threads: laying threads 1 and 4 in place of the warp, with threads 2 and 3, make a square knot.
The pattern "Chameleon" can weave a two-color chain. This technique is also used when the working thread ends, and the work is not finished yet: by swapping the working threads and the warp, weaving continues.
 Leaf Pattern
 Reinforce two threads on the base using the uneven fastening technique.
Take the thread 1 and bring it under the threads 2, 3 and on the thread 4. Then lead the thread 4 on the thread 3, under the thread 1, on the thread 2 and further down into the loop formed between the threads 1 and 2. Then repeat the steps.
The “leaflet” shape is obtained by increasing the distance between the warp threads: the farther apart you lay threads 2 and 3, the wider the “leaflet” will turn out.

Weaving the Leaf pattern can be started with pico. Take the thread, fold it in half and lay it on the pillow with the loop up. Then take the second thread and also loop it up above the first thread. At the four resulting ends, tie a leaf pattern.
Pattern "Gossamer"Strengthen six threads on the base, you will get 12 ends (threads). (Count them, as agreed above, from left to right.)
1. Tie a square knot on strands 5 and 8.
2. Leaving threads 6 and 7 at the base, perform the next square knot with threads 4 and 9.
4. Repeat steps 2 and 3.
 "Chess"
 Square knots tied in a checkerboard pattern will be called a "checkerboard".
Tie three square knots on the first row.
In the second, leave the first two threads unknitted, and on the next four threads (two from the first square knot and two from the second), tie a square knot. Next, tie another square knot on the next four strands. The last two threads will remain untied.

In the third row we work, as in the first, in the fourth row - as in the second.
"Chess" in the corner. To get a corner when weaving a “chess”, in each next row do not knit two threads on each side. Then the number of square knots will decrease from row to row, and one square knot will remain in the last row.

"Chess" from the corner. This technique is used to fill the space in a rhombus, between rhombuses and zigzags. It can also be used at the beginning of weaving a belt.
To make a sample, cut eight threads of 1 m. Conventionally number them from 1 to 8. Lay thread 8 on the pillow with the thread folded up. Fasten the corner in the middle of the thread. Fold the thread in half and fasten at the top of the corner with a lock. You have two ends. To the right and left of thread 1, fasten threads 2 and 3. You will get six (2 + 4) ends. Tie a square knot on the four middle ones.
Fasten threads 4 and 5 to the base. Now you have already formed ten (6 + 4) ends. In the second row, make two square knots: to do this, take two threads from the square knot in the first row and two new threads on the left, then, taking two threads from the square knot in the first row and two new threads on the right, tie a second square knot.

Strengthen on the basis of thread 6 and 7. Now you have 14 ends in work. In the third row, tie 3 square knots: first, work the middle square knot, and then 2 on the sides (one on the right, the other on the left).
In the fourth row, turn on the ends of the thread 8. There will be 16 threads in the work. Tie four square knots.
Lattice patternReinforce eight strands at the base using the extended fastening technique.
Tie four square knots on the first row. In the second and next rows of the warp, leave the same, and change the working threads of adjacent square knots among themselves. Tie four square knots.
So weave four chains of square knots interconnected by crossed working threads.
Rep knot
Rep knot, or, as it was called in the past, double or bead knot, is another of the main macrame knots. It changes its name depending on the direction of the warp thread: if the warp is directed horizontally, it is called horizontal, if the knot is tied on a diagonal basis, it is called diagonal. On horizontal, diagonal and vertical bases, you can make dense patterns and light elegant lace using macrame technique.
horizontal knotFasten two threads to the base. Of the four ends formed, use the first thread on the left as a base, the remaining three threads are working. Lay thread 1 on the working threads from left to right, and pin the place where this thread turns. Hold the base horizontally with your right hand, slightly pulling.

Take thread 2 with your left hand and throw it over the warp to the left. Carefully lay the thread, pulling the warp. Then bring yarn 2 forward, up to the warp and down into the loop. Pull the thread, carefully laying two loops side by side. So you tied a horizontal knot.
Work strands 3 and 4 in the same way. You will get one row of horizontal knots going from left to right.

Try knitting a series of horizontal knots from right to left. To do this, you need to take the thread 4 as the basis. Pin the place where the warp turns with a pin. Take Yarn 3 and loop it over the warp to the right, then bring this yarn forward to the warp and down into the loop. So knit threads 2 and 1. During this work, hold the warp in your left hand, slightly pulling.
Triple horizontal knot. Reinforce two threads on the base using the extended fastening method. Take thread 1 as a basis and knit one horizontal knot on it with thread 2. Now take the spent thread, lay it a second time on the warp and then enter it down into the loop.
Horizontal BridesFasten double threads to the base. The horizontal brid is woven from horizontal knots. To form a horizontal brid to the left, turn the warp thread to the left, pin with a pin on the working cushion and work the voyage knots (which form a horizontal brid) from right to left.
To prevent the product from shrinking, direct the warp thread down, pin it with a pin on the working pillow and make a rep knot with the warp thread of the previous row.

Rhombus from horizontal brid.
Divide the number of threads in half. Cross the central threads 6 and 7.
Take thread 6 as a basis, work four horizontal brids from left to right, weaving the warp of the previous brid in each subsequent row.

Turn the base of the right group to the left, the left group to the right and weave four rows of horizontal brid. Weave the central threads together, observing the rep knot.
Diagonal BridesThere are six strands at work. To form a diagonal brid, pull the extreme thread to the left diagonally over all the threads and alternately weave the rep knots with each working thread. Then turn the thread to the right, pin the turn with a pin on the working pillow and weave a diagonal brid. Similarly, hemstitching is performed from two brids located side by side.
 Pattern "Simple X"
 There are eight threads in the work. Count the threads from left to right.
Divide the number of threads in half. Take the extreme threads 1 and 8 as a basis. Run diagonal bridles towards each other, connect the threads in the center with a rep knot and weave the bridles diagonally from the center to the edges on the same bases.
 Pattern "Rhombus"
 Continuing the "Simple X" pattern, turn the warp threads to the center, pin the turn with a pin on the working pillow. The lower part of the "X" pattern is half of the "Diamond" pattern.
Run diagonal bridles to the center - you get a "Rhombus" pattern.

By alternating these patterns, you can get a light lace.
Pattern "Double X"There are 12 strands in the work. Count the threads from left to right.
Divide the number of threads in half. Take threads 1 and 12 as a basis. Run one diagonal bride to the center. Run the second row closely under the first, including the warp threads of the first row. Connect the meeting breeds with each other, observing the rep knot. Follow the second part of the pattern in the same way as the first, but only from the center to the edges.
 Pattern "Complex X"
 This pattern is elegant and beautiful, it can decorate any product: a belt, a bag, a panel.
The "Complex X" pattern is similar to the "Double X" pattern, only it is complicated by the third brida.
 Pattern "Window"
 There are 12 strands in the work. Count the threads from left to right.
Take threads 6 and 7 as a basis. Open the rhombus, that is, perform one row of diagonal knots in different directions. Pin the turn with a pin on the working pad.
To get a “window”, when closing the rhombus on the left side, successively weave threads 5, 4, 3, 2. In the same order, follow the pattern on the right side with threads 8, 9, 10, 11.

Connect the warp threads to each other, observing the rep knot.
Diagonal checkered breechesThere are 12 strands in the work. Count the threads from left to right.
Divide the threads into groups of four. The first group: threads 1-4; second group: threads 5–8; third group: threads 9-12. In each group, perform two diagonal bridges from left to right. Weave the second row in a checkerboard pattern from right to left, leaving the first two threads unwoven.

Take thread 3 as a basis, pull it from right to left and make two diagonal bridles on it.
Perform the following breezes on strands 7-10.
Pattern "Flower"There are 12 strands in the work. Count the threads from left to right.
Divide the number of threads in half. Bend the warp thread in the shape of a petal.
The sequence of actions when making the "Flower" pattern is the same as when weaving the "Double X" pattern.
 Pattern "Leaves"
 Pattern "Leaves" perform in a checkerboard pattern as a "checkerboard" of diagonal brids and based on the shape of the petal in the "Flower" pattern.

This pattern looks good on purses, handbags, cosmetic bags, and can be the background pattern of any product.
Pattern "Fan"There are 16 strands in the work. Count the threads from left to right.
Divide the number of threads in half. Run on strands 1 and 16 along a diagonal brid to the center and six diagonal brid, placing them in a fan shape: on the right - three brid from left to right, three brid from right to left; on the left - three bridges from right to left, three bridges from left to right.

In the center of the pattern, make a rhombus and repeat the pattern again.
Pattern "Peacock tail"There are 20 strands in the work.
Divide the number of threads in half. Run from the center to the edges on each side of eight diagonal brid, placing them in a fan shape.
 Pattern "Cross"
 Two threads - bend the four ends in half and pin the place of the fold with pins on the working pillow. Pull the left end thread with your right hand, tie a rep knot on it with the second end, then pull the right end thread with your left hand, make three rep knots and another knot with thread 4 on thread 3.
 Pattern "Button"
 There are ten strands at work.
Cross the middle threads 5 and 6 and open the rhombus. On each half of the half-rhombus, make one square knot. The threads of the base of the rhombus are not involved in the work. The threads of the right square knot are the warps, the threads of the left square knot are the workers.

Perform four rows of diagonal knots, another square knot on the left and right sides and close the rhombus.
This pattern can be done outside the rhombus.
Auxiliary nodes
Knot "Through the hand"Lay the thread vertically on the work pad. Pin the upper end with a pin, lift the lower end up, make a loop, lower the end of the thread into the loop and tighten both ends.
 Knot "Capuchin"
 Pin the upper end of the thread with a pin on the working pillow, lift the lower end up, wrap it around the right side of the loop 2-3 times and tighten both ends.

This knot is expressive and durable, it is good for them to finish small items, tying it at the end of the threads.
Knot "Earrings"Pin the right end of the thread with a pin on the working pillow. Form a loop with the left end from the bottom up, wrap it tightly from top to bottom in a spiral and lower the end of the thread into the loop. Holding the winding with two fingers, pull up both ends and cut off the bottom end.
 One-sided loops (knot in a circle; horizon; simple knot)
 Pull the warp with your right hand, with your left hand, throw a loop on the warp with a working thread, under it and into the loop, lower the end of the thread and repeat the work.
Loops can be thrown on the right and left sides, depending on which side you need to make knots.

As a result of weaving with one-sided loops, a cord is obtained that is twisted in a spiral.
Reversible hingesFasten two double threads to the base, and the side threads (workers) should be four times longer than the inner threads (warp threads). With extreme threads, alternately throw one-sided loops on the base on the right and left sides.
 Lace "Zigzag" ("Snake", "Herringbone")
 Pin with a pin on the working pillow in the center one thread - two ends. Pull one end, make a one-sided loop with the other, then pull the other end, and first make a one-sided loop.
In order not to make a mistake, you should learn that you need to pull the thread that comes from under the knot.
One-sided loops made alternately are also called a simple knot.
Tatting knotFasten two double threads to the base, and the side threads (workers) should be four times longer than the inner threads (warp threads).
Sew a one-sided loop with a long thread, then bring the working thread under the warp and pull it into the loop from top to bottom.

Continuing to work, get a smooth lace from tatting knots.
Double-sided tatting chainTie tatting knots with threads 1 and 4 on the warps.
 Merezhka tatting on four strands
 There are four strands at work. Threads 1 and 4 are warps, threads 2 and 3 are workers.
Tie tatting knots: thread 3 - on thread 1, thread 2 - on thread 4, thread 2 - on thread 1, thread 3 - on thread 4.
 Tatting lace with pico
 There are four strands at work. Threads 1 and 4 are working threads, threads 2 and 3 are warps.
Run threads 1 and 4 with tatting knots and tighten tightly. If you fasten the working threads with pins at a certain distance from the warp, you get a decorative lace with a pico around the edges.
 Tatting hemstitch on six and eight threads
 Both hemstitches are performed similarly to tatting knots. The difference is that in the first case, the basis is threads 2 and 5, in the other, threads 2 and 3, 6 and 7.
 Flat braid
 Flat braid can be made on three, four, five or more threads. Work from right to left. Put thread 4 on thread 3 under thread 2 and on thread 1, etc. You will get a braid on four threads. Similarly, flat braid is performed on five threads or more.

Handles for bags, mesh in a checkerboard pattern, binding for sandals, etc. are made with this braid.
Chinese knotFasten two threads on the working pillow - four ends. End 1 enters the loop formed by end 2, end 2 enters the loop formed by end 3, end 3 enters the loop formed by end 4, end 4 enters the loop formed by end 1. Carefully tighten the threads.

According to the principle of the Chinese knot, the “Wreath” pattern is made from only eight threads.
Knot "Josephine"Take two threads. Form a loop from one thread, place the other on the lower and under the upper ends of the loop, then on the upper thread of the first loop and under the second on the lower edge. Tighten the threads carefully.

Thread length calculation
This is a very important step in the work. It is quite difficult to accurately calculate the required thread length for a particular product. The consumption of threads depends on many factors: on the intended size of the product, the knots and patterns used, the thickness and texture of the threads, the individual performance of the master (one strongly tightens the knots, the second is weaker, and the third generally weaves more openwork). Finished products made by different needlewomen, but according to one sample, have different lengths and widths.
Usually in product descriptions, the calculation is given with some margin. The thread fixed on the base should be four times longer than the finished product. When attaching the thread to the warp, the thread folds in half. The length of the thread should accordingly double and be eight times longer than the intended product. If the product consists of separate parts or elements for them, then calculate the length of the threads separately.
Approximate thread consumption for different knots

A thin thread in the process of work is shortened less than a thick one. A product made with a thin thread will be shorter than the same product made with a thick cord. To achieve the desired thickness, a thin thread must be applied in several additions (two, three, four, five or more).
Even if the calculation of the threads was done correctly, at the end of the work a situation may arise when the length of the threads is not enough for weaving. In this case, you need to either try to increase the threads (tie or glue segments of new threads to the threads of work, thereby leaving the number of threads of work unchanged), or introduce additional new threads into the weaving (by any of the attachment methods), thereby increasing the number of threads of work.
macrame products
Modern needlewomen who know knot weaving continue to develop and improve this art. Panels, curtains, vases and napkins made using the macrame technique harmoniously fit into the interiors of country houses, decorate rooms in a romantic or rustic style. Pendants, bracelets, belts, handbags, cosmetic bags can give individuality to a modern woman, show her extravagant taste.
To master this oldest of handicrafts, in addition to desire, dedication, patience, a little imagination and imagination are needed.
If you decide to dedicate a few hours of free time to weaving, then be sure to interrupt work for warm-ups. From working with thin threads, the eyes get tired the most. In the manufacture of large products, not only the hands, but also the legs become numb. Therefore, during a break in work, you need to do a little gymnastics for the eyes, walk around the room, perform simple exercises for arms, legs and back.
Having mastered the basic knots used in the macrame technique, having studied the techniques of weaving chains, braids, lace surfaces, you can already begin to create your first independent work. In the future, in order to move on to more complex products, you need to study the features of their weaving.
Jewelry, clothing
Macrame products: lace cuffs, braided flowers and cords - complement the clothes; from them you can make volumetric patterns.
Using the macrame technique, you can weave various neck jewelry - necklaces and pendants - in ethnic style. Neck decorations are usually lace bands, consisting of motifs united by fragments of woven braid; they are decorated with scallops, tassels, and may include additional decorations (wooden balls, natural materials, ready-made pendants with natural stones).
Wicker bracelets can be independent decorations. They are often performed complete with a neck decoration. In this case, both objects are woven from the same threads, the same pattern is used in bracelets as in neck jewelry, the clasps are made in the same way; bracelets are decorated with the same additional elements - balls, brushes, natural materials.
The individuality of the hostess is emphasized by purses, handbags for documents, cosmetic bags or hand-woven shopping bags. Wallets can be woven into an envelope (square or rectangular shape) with a flap. Envelopes-purses are woven in the form of a single canvas. Handles are made of measured macrame lace - strips of double square knots, chains, decorated with wooden balls, pebbles, decorated with tassels.
The original wardrobe items are belts. Woven using the macrame technique, they are usually lace strips of motifs, decorated with the same elements as breast jewelry and bracelets. Belts can be of different widths: from the narrowest - "snakes" to wide, focusing on themselves. Braided belts go well with various fabrics and textures: wool, linen, denim, velveteen. Macrame sashes can be worn with skirts, trousers and dresses.
An original wicker keychain can be a wonderful handmade gift. This accessory can be made in the same style with a purse or handbag to make a set.
Decorative additions to clothing and jewelry can be woven from linen and cord threads, soft synthetic yarn with good twist, floss in several additions, threads "Poppy", "Tulip", "Narcissus".
Details of clothes, handbags, neck jewelry, bracelets, key rings made in the technique of macrame are unique. Their value is determined not by the cost of the material, but by the originality of the execution.
Breast decoration "Turkish knot"
The macrame technique allows the master to show his imagination in all its breadth. Any node in the author's product can be used as a dominant or become a separate work itself. This statement directly relates to such a macrame technique as the Turkish knot.
Unlike knots that need to be fixed, in the technique of weaving macrame there are a number of knots that do not require tightening the threads - these are braided knots. Such braided knots are formed due to the interlacing of threads. Masters of the past centuries skillfully used braided knots in all types of applied art. In the composition with tassels, knots, braids decorated mirrors, belts, weapons, wallets, clothing details.
In Russia, the braided knot has been known since ancient times. This is a favorite motif of Russian ornament. It is no coincidence that when typography appeared in Russia, it was the braided knot that adorned the pages of the books of the first printer Ivan Fedorov.
The Turkish knot is a braided knot that does not require tightening. It is best to perform it from well-twisted threads or from flat braid.
When tying a Turkish knot, the Josephine weave is first performed. And then the two free ends of the thread repeat the weaving of "Josephine".
A graphic Turkish knot, made large, can be attached to a cord that harmonizes in color and texture with the material of the knot. Instead of a cord, you can weave a braid, for example, from a single chain.
The Turkish knot can be made voluminous. To do this, all interlaced threads should be pulled to the center. Get a twisted ball. Balls from Turkish knots can serve as a great addition to the product, they can be used instead of brushes, fringe.
Set "Autumn"Unique jewelry made using the macrame technique with your own hands from natural materials (wooden beads and cotton thread) is now very popular.
Set "Autumn", consisting of an original necklace, bracelet and key ring, is a stylish decoration that is in harmony with natural fabrics that are now fashionable - linen and cotton. External simplicity and natural purity of materials emphasize the natural beauty of the decoration.
You can craft one of these interesting items. Two items will make a harmonious pair, complementing each other. And all three items are a set that will emphasize the individuality of the hostess (see photo 1–3 on the insert).
Necklace. To weave a necklace, you will need four strands of 3 m each, several wooden beads of different sizes and ordinary oak acorns.
Clasp options can be chosen at will: the necklace can be fastened with a loop from the “Berry” knot; on a ring and a stick woven into the beginning and end of the product; on a ready-made lock, which can be bought at a needlework accessories store.
A rather strong (and corresponding to the spirit of weaving) clasp is the clasp on the Berry knot. To do this, at the beginning of work, all weaving threads are hung on the working base and flat double knots are made. The length of the track of double flat knots is 1.5–2 cm. After the track is woven, the “Berry” knot is tied, the threads are threaded through the last weaving link and the knot is fixed.
Next, you need to complete 15 double flat knots with scallops. Then the warp threads are threaded into a through hole that is drilled in the stomach; weaving threads simply border the acorn and are fastened with a flat knot at the bottom. The acorn must be chosen not very large.
This element is followed by a track of three flat double knots with pico.
Next, a ball is woven into the work. The warp threads are threaded into the hole of the ball, the weaving threads fix it below. After that, weave a track of three flat double knots with pico. Then the ball is woven into the work again.
Further work proceeds as follows: three flat double knots with pico - acorn (large size) - three flat double knots with pico - wooden ball - three flat double knots with pico - wooden ball - three flat double knots with pico - acorn (medium-sized corresponding to the size of the first acorn) - 15 double flat knots with pico.
After the path of double flat knots with pico is completed, two more flat knots are woven, tightening them as much as possible. Then all the threads (both the warp threads and the weaving threads) are tied with a simple knot. It turns out a small brush. After that, all the threads are cut to an equal length, a small ball is strengthened at the end of each thread, fixing it with two simple knots tied immediately before and after the ball.
Bracelet. To make a bracelet, you will need four strands of 1 m each, wooden beads, and an acorn.
The bracelet is a smaller copy of the necklace from this set. The beginning of work completely coincides: four threads are fastened, a path of double flat knots is woven, a “berry” is tied, fixed, then four double flat knots with pico are woven.
a ring is attached to the warp threads (fixed with weaving threads);
Again, a ring is attached to the warp threads (fixed with weaving threads);
Perform two double flat knots with pico;
A ring with balls is fastened with weaving threads on the warp threads;
Perform two double flat knots with pico;
A ring is attached to the warp threads (fixed with weaving threads);
perform two double flat knots with pico;
the last ring is attached to the warp threads (fixed with weaving threads);
perform four double flat knots with pico.
Weaving ends with the fact that all the threads are tied into a brush with a simple knot, the ends are cut to the same length and small balls are fixed on the threads.
Trinket. To create this keychain, you can not do without ready-made accessories. Purchase a special key ring in the store (you can also use the old ring by simply removing the annoying purchase keychain from it). The design required for the key fob should be as follows: a detachable key ring, a small chain and a one-piece small ring for which the weave will be attached. You will also need threads, four small balls and a large acorn for the main motif, and four small balls for decorating the brush.
Four threads about 0.5 m long are attached directly to the small ring of the key fob, then two double flat knots are woven, while they are tightened quite tightly so that the weave is located close to the metal part of the key fob.
After the motif of two double flat knots, there is a combination of balls and an acorn: two small balls - one large acorn - two small balls. Attach them like this. Weaving threads are threaded into through holes of two medium-sized balls; the balls are simultaneously pulled up as much as possible, close to the double flat knots, then both weaving threads and the warp threads are threaded into the through hole of a large acorn. After that, the threads diverge again, so that two more small balls are strung on two of them - on the weaving threads.
Then this whole combination of balls and an acorn is pulled up and firmly fixed with two flat knots. It is important that the combination of balls is fixed very tightly: paired balls should be strengthened symmetrically, neither the acorn, nor any of the balls should slide freely or turn easily on the weave.
After the “lock” of double flat knots, under the combination of balls and acorn, weave a path of three double flat knots with picot.
Weaving is completed with two tightly tightened flat knots, all threads are tied with a simple knot so that a brush is formed. The ends of the threads are cut along one line, a small ball is attached to each thread.
Set "Currant"Bracelet(see photo 4 on the insert). To make a bracelet, you will need a base: either a ready-made bracelet made of plastic, metal, wood, or a strip of dense flexible plastic 2–2.5 cm wide, as well as cotton threads (“iris”, “poppy”, “lilac” or “tulip "). To decorate the bracelet, you will need small wooden balls with through holes and a cord made of synthetic material, thicker than the cotton threads from which the bracelet itself will be made.
Start work with the preparatory part: cut the cord into fragments 3.5-4 cm long according to the number of wooden balls. String two balls on each piece of cord and tie knots at the ends of the pieces so that the balls do not slip off the cord. You will get pieces of cord with knots at the ends and with two balls - these decorative elements will decorate the bracelet.
Then braid the bracelet with cotton threads. In order to form a relief border along the edge of the bracelet, make a braid using a tatting knot. Do it with one thread, since the basis of weaving is the bracelet itself.
At the beginning of work, weave a section of tatting knots and then place a decorative element - a piece of lace with balls - into a one-sided loop under the base (bracelet). Pull up the weaving thread. If necessary, align the decorative element - pull it up so that the weaving thread divides it exactly in half. After that, continue weaving, alternating tatting knots and decorative elements.
Carefully process the joint of the work - the place where the braid begins and ends. At the end of the work, tie the end of the thread with which the braid was braided with a Heracles knot to the end of the thread with which the braid began. The knot is best done on the inside of the bracelet. Thread the ends of the threads with a thin crochet hook or needle under the braid.
Earrings(see photo 5 on the insert). To make earrings, you will need: a base (finished earrings - large closed or open rings or half rings with various locks), cotton threads - the same as for a bracelet. To decorate earrings, you need the same decorative elements as for a bracelet.
Braid the earrings with tatting knots and decorate with laces with wooden balls using the same technology as the bracelet.
At the end of the work, after you tie the last knot, tighten it as tightly as possible. After that, drop a drop of superglue (universal quick-drying glue, which is usually sold in tubes weighing 1 g) to the area of \u200b\u200bthe free thread (about 2-3 mm). Press the section of thread smeared with glue to the wrong side of the weave and press for a few seconds, then cut off the excess end of the thread.
Belt "Lotus" (see photo 6 on the insert)
For a belt, you will need two natural threads (linen, cotton) of 5 m each, for a fastener - a wooden ring and a wooden stick-cylinder.
The surface of the belt is woven like a strip of motifs formed by double flat knots with scallops. Striped motifs consist of four double flat knots creating three scallops of different heights (two small and one high symmetrically arranged).
First you need to fix two threads on a wooden stick-cylinder so that four threads are formed. Work begins with weaving a motif - four double flat knots with scallops. This is followed by a motif of loose threads (the length of the threads is 2.5–3 cm). It turns out a kind of gap between the knots woven above and the knots that will be tied below. It is necessary to ensure that in this gap the warp threads (the inner threads on which knots are tied) are taut, and the working threads (left and right extreme) form small arcs.
After the motif of loose threads, the motif of four double flat knots with scallops follows again.
So motives and gaps alternate along the entire length of the belt. The work is completed with a motive. After that, the weaving threads are attached to the ring - the belt clasp, the excess ends are cut off.
For the clasp ring, you can use a wooden cornice ring (usually a spare, included in the kit); in the absence of a wooden ring, any metal ring (for example, from a key fob) will do, braided with the same threads from which the belt itself is made. The braid can be made from single flat knots (with a spiral in any direction - to the right or left) or in the form of a track of double flat knots).
Souvenirs, toys
A souvenir made using the macrame technique is a great gift for any occasion. A large number of various knots used in weaving macrame allows you to create original, memorable things that reflect the individuality of the master and, most importantly, help to reveal the author's attitude towards the person for whom the souvenir is intended. Each knot, tied by the hands of the master, carries a charge of positive emotions, good wishes.
Souvenirs made using the macrame technique have a very long history. Small wicker figurines and trinkets have been knitted at all times. And in all countries, small woven macrame souvenirs have their own characteristics and differ from each other. Thus, bright and colorful Costa Rican figurines depicting men and animals differ from Estonian figurines made of natural threads in natural gray-brown tones.
Gift souvenirs include original key chains and mobile phones, children's small chest bags for schoolchildren (you can carry money for breakfast in them), exclusive bookmarks for books, ballpoint pens braided with macramé knots, lace stripes - laces for phones, cases for glasses , a decorative overlay to a frame for photos. In weaving macrame souvenirs, you can use various decorations - wooden or plastic beads, decorative brushes, pompons, artificial flowers made of fabric, beads, threads, birch bark, buttons of an unusual shape, beads, glass beads, natural material - acorns, chestnuts, sticks, pebbles .
Special place occupy such souvenirs as toys. They can be of various sizes: from the smallest decorative ones, whose place is only on a bookshelf, to large, "real" ones that can become a child's playmate. Moreover, small toys made using the macrame technique can not only be an independent decorative element, but can also be used to make functional souvenirs. For example, a funny little turtle or a graceful snake will decorate a keychain or a mobile phone.
The uniqueness of a hand-made souvenir is a guarantee that this gift will be highly appreciated.
Snake (see photo 7 on the sticker)For this souvenir toy, you will need 3 m of 1 mm thick cord, two glass or plastic beads and a small piece of red felt.
Two threads 1.5 m long each are pinned to the pillow. In this case, the middle ends (warp threads) should be 15 cm shorter than the working threads. At the four ends obtained, five to seven double flat knots are woven. From the resulting cord form a "berry". This will be the head of the snake.
The body of the toy is knitted from the most common chain in weaving macrame - “snakes”. For this souvenir, a double “snake” chain is made, since four threads are involved in weaving. A double chain "snake" is often called beaded. This name comes from the fact that in the places where the threads are intertwined - the corners - small rounded nodules are formed, similar to balls of beads.
After weaving the head of the toy from double flat knots, the ends of the threads should be even. Now, in the weaving of the chain, the warp threads and working threads are consumed evenly.
After the body of the toy is woven, the threads are tied with a Heracles knot and the excess ends of the threads are cut off.
To decorate the head of the toy, you need to sew beads on the snake's head and sew or glue a forked tongue cut out of red felt.
Keychain-amulet (see photo 8 on the insert)To make this keychain, you will need a thick silk or cotton thread about 2 m long, a key ring, a bead, a cat's eye stone.
Four threads about 0.5 m long are attached directly to the metal ring of the future amulet, then two double flat knots are woven, while tightening them quite tightly so that the weave is located close to the ring.
a bead is strung on the working threads, the working threads simply go around it;
perform a motive of seven double knots;
attach a pebble "cat's eye".
The ends of the threads are fixed with glue on the wrong side of the weave. To do this, it is better to choose "Superglue" (available in a package of 15 ml).
Caterpillar (see photo 9 on the sticker)To weave this toy, you will need 5 m of 1 mm thick cord and two glass or plastic beads.
Two threads 2.5 m long each are pinned to the pillow. In this case, the middle ends should be the length that the caterpillar will be (in our case, 30 cm). At the four ends obtained, five double flat knots are woven. From the resulting cord form a "berry" - this will be the head of the caterpillar.
To make the body, the end of the wire is fixed to the head and braided to the central knotted threads. Two double flat knots are woven on these central knotted threads and wire. Then the wire is excluded from weaving (simply taken aside).
On four threads weave a "berry" of five double knots, tighten. Then the wire is returned to the weaving, and two fixing knots "Berries" are woven on two warp threads and wire. Then the wire is excluded again.
Thus, five more "berries" are woven. Then one knotted thread is cut out and two more “berries” are woven - the wire is returned to weaving when two fixing double knots are woven. When weaving the last "berry", the knots are tightened as tight as possible.
The second knotted thread is cut out and a “snake” chain of four to five knots is woven on two working threads and wire; the last knot is tightly tightened. The ends of the threads and wire are cut off, the end of the wire is bent.
Then the resulting chain is bent, giving the toy a pose of a caterpillar lying on a leaf.
In order to decorate the head of the caterpillar, you need to sew on bead eyes.
Turtle (see photo 10 on the insert)To work, you will need six threads 1.5 m long each. Weaving toys is performed according to the following scheme.
First weave the turtle's head. Two threads are pinned to the pillow in the middle and five double flat knots are woven at the four ends obtained. A “berry” is made from a woven cord of flat knots by dragging the knotted threads into loops above the first knot. To fix the "berry" you need to make a single flat knot under it. This "Berry" will be the turtle's head.
For the manufacture of the front legs, two threads are pinned to the pillow in the middle. At the four ends obtained, two double flat knots are made (two side threads will be weaving threads, two threads in the middle will be warp threads). You need to make two such legs.
The shell is knitted with brids and woven from threads coming from the head and front legs of the turtle. Five brids are woven under each leg. Moreover, to obtain a convex shell, the two extreme brids are pulled tighter, then they become shorter than the three inner ones, and due to this, the surface of the shell will bend during weaving.
To connect with the back legs, leave the leftmost thread on the left leg and the rightmost thread on the right leg free. Of the remaining five threads (two working threads based on three threads), a double flat knot is tied. Next, a rhombus of five Brides is knitted.
The transition to the rear legs is performed in the same way as the transition from the front legs to the shell. After a double flat knot of five threads is tied, two free threads from the legs are introduced into the work: with all the threads (six threads on each side), five brids on the left and five brids on the right are tied. Then the extreme right thread of the left leg and the extreme left thread of the right leg are excluded from the work - they will go to knitting the tail. Of the remaining threads, one double flat knot and one simple knot are tied (left or right, according to which leg it is tied on). After that, the threads are cut.
The tail of the turtle is formed by two brids, woven from threads that were left especially for him.
After finishing work, the excess ends of the threads are cut off.
If the product is woven from loose, crumbling, loose or fleecy material, then all cut ends must be coated with PVA glue and bent to the wrong side.
Puppet (see photo 11 on the insert)To make a puppet, you will need two wooden slats, threads of two colors, two buttons for the eye and one for the spout, a few centimeters of strong, but not too thick fishing line.
The body, head and paws are made of pompoms. You will need four pom-poms for the puppet: three (two paws and a head) are the same size, a pom-pom for the body is slightly larger. To make pompoms for the head and paws, two circles with an outer diameter of 30 cm are cut out of thick cardboard, for the pompom of the body - two circles with a diameter of 40 cm. In the middle of each circle, a hole with a diameter of 10 cm is cut out - for the pompoms of the head and paws and 15 cm - for the pompom of the body.
The circles are folded in pairs, and a fishing line is drawn between the resulting “bagels” - it will tighten the pompom. “Bablis”, folded together, with a fishing line laid between them, are wrapped with threads until the hole is completely closed. Then the threads are cut along the outer edge, for which one of the cutting surfaces of the scissors is inserted between the cardboard circles and the threads are cut in a circle. Gently tighten the fishing line, pulling the cut threads into a tight bundle. The cardboard circles are removed, after which the bundle of threads is tightly tightened and the fishing line is fixed with a Heracles knot.
At the finished pompom, protruding threads (if any) are cut. The pom-pom can be held over the steam to make the threads soft and the pom-pom itself fluffy.
The neck and legs of the puppet are knitted from single flat knots with a “lock” on the left of the same threads from which the body, head and legs are made.
Then buttons-eyes and a button-nose are sewn onto the pompom of the head. Buttons can be covered with a fabric that contrasts in color with the threads from which the puppet is made.
The pompoms of the paws are connected to the legs, the legs are attached to the body, the body is connected to the head by the neck. Four elements of the toy: a torso, two legs and a head - are attached to wooden slats with free threads. The slats themselves are fastened to each other crosswise.
Macrame in the interior of the apartment
Products woven using macrame technique look very organic in a modern interior. They will complement the existing design of the apartment, and when creating a new interior, they can become dominant. Wickerwork goes well with various subjects, bring originality to the decoration of the house, create comfort.
In modern apartments, the hallway is often small, it usually has three or four doors, two of which are often with glass inserts. Such a hallway can be made very cozy by hanging openwork curtains in the form of lattices or intertwining chains on glass doors. Door glass can be decorated with thematic or plot compositions.
Macrame weaving goes well with various natural materials: wood, bark, acorns, chestnuts, etc. Using these materials, you can make original stylish panels on doors and walls.
The limited space of the hallway does not allow convenient placement of multi-tiered shelves for shoes, a capacious newspaper rack for the press, which is delivered in excess to mailboxes. Here you can take advantage of the possibilities of macrame, for example, create small wicker products with pockets for shoes, umbrellas, newspapers, scarves and gloves. Such products perform not only a utilitarian function - they will become part of the design of the hallway. Wicker shelves and panels with pockets can be attached to the wall, hung on the cabinet door and even on front door.
Doorways can be decorated with "rain" - original curtains, which are made of chains, braids, braids, knitted from a linen cord or sisal, and decorated with tassels. The elements of the "rain" (chains, pigtails, braid) should sag well, so wooden balls or even metal objects should be woven into the elements and brushes.
The possibilities of macrame in the design of rooms are endless. Panels, bedspreads, napkins, paths made using the macrame technique will decorate any room. On a bed, sofa, chairs, you can weave bedspreads from a finishing or massive linen cord. The sofa will be decorated with original pillows - woven voluminous toys or flat compositions, which are then sewn onto thought pillows. Small rugs are very elegant - they can be thrown over furniture or laid on the floor.
Another interesting area of application for macrame in the interior of a room is screens. The floor sliding screen is a mobile device that helps to divide the room into separate zones and at the same time complements the interior ensemble. Such a screen is not only functional, it also performs an exclusively decorative role: for example, a lamp located behind a screen that stands against the wall creates the effect of an ongoing space. The screen can be not only floor, but also ceiling. It is carried out in the form of a "rain" on slats, which are fixed on the ceiling.
Various fantasy compositions, magazine racks, planters, wall medallions go well with modern furnishings. Colored panels are woven from an ordinary linen or finishing cord. Curtains and curtains can be made for windows. Wicker planters allow you to decorate not only windows, but also walls.
However, you should not overload the apartment with even the most beautiful things - two or three wicker products are enough. They should be in harmony with each other and blend well with the overall interior of the house, match the environment, complement it.
Macrame products for home decoration can be divided into two main groups: flat and voluminous. The flat ones include napkins, runners, curtains, screens, panels, and the voluminous ones include planters, toys for decorating the interior, magazine racks, and various fantasy compositions.
Decorative products of rectangular or square shapeDecorative ornaments of a rectangular or square shape (wall decorations, napkins, walkways, furniture capes) are a universal addition to the design of almost any interior. Such products can be woven from almost any material - from cord and linen threads to a flat cotton cord. Strictly rectangular or square products have their own weaving features. Unlike measured products, rectangular ones can be started to weave not only from the top, but also from the middle.
For square and rectangular products, it is easy to calculate the required thread length. Suppose you need to weave a napkin 10 cm wide and 20 cm long. The width is determined by the number of threads thrown over. The approximate width of two threads thrown over is 1 cm. Therefore, with a product width of 10 cm, you will need 20 threads thrown over. The length of the thrown threads is set along the length of the napkin. Experience shows that when weaving a surface from double flat knots, the threads are shortened by about four times. This means that if the product is weaved from double flat knots, then the length of the thrown thread should be 80 cm. Thus, to weave a 10 x 20 cm napkin from double flat knots, you need to take 10 single threads 1 m 60 cm long.
Path to the tableThis walkway will decorate the dining table in the kitchen. You can make a whole kitchen set: weave a path and follow the same pattern - a few napkins for it.
Approximate dimensions of the track: length - 40 cm, width - 15 cm.
To work, you will need 12 single natural threads 6 m long, two wooden knitting needles with stops (for example, with balls that will prevent the knitting from slipping off the knitting needles). Knitting needles with props are needed not only so that knitting keeps its shape, but also in order to give originality and originality to the work.
The surface of the table track will consist of "radii" - motifs that are connected by six double flat knots each.
All 12 threads are fixed on a wooden knitting needle with supports, which will become the working basis of the track. The fixed threads are divided into three bundles - eight threads in each bundle. A distance of approximately 2 cm must be maintained between the beams. The weaving of the track surface is carried out in a checkerboard pattern. Each motif is about 1.5 cm apart from the other.
When creating the first and second rows of track motifs, the working threads of the bundles (the extreme right and left threads) are first thrown up, behind the working warp - when weaving the upper halves of the radii, and then down, under the working warp - when weaving the lower halves of the radii. In the third and subsequent rows, the working threads are thrown only down. The number of rows in the track is arbitrary. You can make a small product, close in shape to a square, or you can knit a large track for almost the entire length of the table. At the end of the work, the loose threads on the second wooden knitting needle are fixed, the excess ends are cut off.
Small panel (see photo 12 on the insert)This small panel can be used as a small stationery organizer by hanging it next to the desktop, you can put a pen or pencil in the panel. To make it, you will need 18 threads 1 m long.
Make a brush. To do this, gather the threads into a bundle, squeeze tightly and make four or five turns around the bundle of threads with one of the threads.
Then around the brush, perform a brid in one turn. From this brush with a "skirt" start weaving. Divide the threads into three equal parts (six threads each). On the middle beam, make a chain of square knots with a lock on the right. On the two extreme beams, weave paths from the following combination: a motif from tatting knots; three picots of different heights; three tatting knots; pico of different heights; motif from tatting knots. The outer tracks should be longer than the middle one.
Combine all three tracks, weave four square flat knots. You get an oval closed element with a chain in the middle.
After that, again divide the threads into three bundles and again perform a chain of square knots with a lock on the right on the middle bundle. On the two extreme beams, weave paths from the following combination: a long motif from tatting knots; five picots of different heights; long motif of tatting knots. Make the outer tracks longer than the middle one again.
Combine the tracks, weave five square flat knots.
Then repeat the first motive.
At the end of the work, pull the threads with two square flat knots, which are very tight. Trim the brushes evenly and neatly.
Panel (see photo 13 on the insert)For work, you will need six bunches of three threads 80 cm long, two bunches of dry grass, a flower arrangement.
Wrap bunches of dry grass in three places with several turns of thread and carefully cut along the edges. They will be the basis of your panel.
Fold the yarn bundles in half and fasten on the warp as follows: place the bundle on the warp with the loop up, fold the loop back over the warp, thread the two ends through the loop and tighten it by pulling both ends down. The horizontal bar of the loop will be on the front side of the set.
As a result, it turns out that six bunches of six threads will be fixed on the base of the grass. Divide each bundle into two parts - three threads each.
On neighboring bundles, tie knots "through the hand" in a checkerboard pattern.
Fasten the panel canvas on the second bunch of dry grass with the same knots.
Attach a flower arrangement to the panel.
Composition for a mirror, wall (see photo 14 on the insert)The composition consists of five lace stripes, which are fixed on a frame of three rings; a multi-row cord with a loop is attached to the frame, by which the composition is suspended. For work, you will need threads such as "Tulip", "Chamomile", etc. The total footage of the threads for the composition is about 5 m. For the frame, you need three plastic rings with a diameter of about 6 cm.
When working with rings, it is not always possible to completely cover their surface with the free ends of the threads left over from weaving certain fragments or details. In this case, in order not to collect too many additional threads, you can use the braid of the ring.
There are two main options for braiding rings: combined and independent braid.
Combined braid- braiding the ring with threads from which the product is knitted, and additional threads. The free ends of the threads left over from weaving are strung on the ring; in the course of work, single threads are fixed between them. At one end of the weaving thread, five or six simple one-sided braid knots are made. Five or six braid knots are also made towards her with one end of the additional thread.
Independent braid- the ring is braided independently of the main product and is attached directly to the product already braided. This version of the braid was used in the manufacture of this decorative composition.
So, all three rings are braided with threads using a double tatting knot. The rings are embossed, the composition looks more spectacular on them.
Braided rings are fastened together arbitrarily, but in such a way that the fastening points can then be masked with lace stripes.
Weave five lace stripes for the center of the composition. Four threads are imposed on the base (it is better to take a ballpoint pen or a pencil with a large diameter). The working threads should be 1.5–2 times longer than the warp threads.
Next, weave a double flat knot, three festoons, two double flat knots, three festoons, three double flat knots, three festoons, one double flat knot, six festoons, a "berry" of 17 double flat knots. The strips are attached to the frame, masking the junctions of the rings.
Weave a multi-row cord. To do this, measure eight threads of 3 m each, fold the bundle of threads in half and weave 1.5–2 cm of a motif from double flat knots from the place of the fold in both directions.
Further weaving pattern is:
the threads connect and weave 1 cm from double flat knots - you get a loop for which you can hang the product;
the threads are divided into two equal bundles;
weave motifs from one-sided flat knots;
weave small motifs from double flat knots;
the threads are again divided into two equal bundles. The scheme of weaving the extreme parts of the multi-row cord:
perform
perform
attached to the frame rings. The scheme of weaving the internal parts of a multi-row cord:
perform a motive from one-sided flat knots;
combine the threads of the inner parts of the cord - weave one double flat knot connecting the left and right inner parts of the cord;
threads divide and weave a motif from one-sided flat knots;
attached to the frame rings.
Further, from the threads attached to the frame, weave according to the motif of one-sided flat knots and the motif of double flat knots with a scallop. The ends of the threads are tied with a simple knot, the excess threads are cut, forming a decorative brush.
Decorative products of round and oval shapeIn the macrame technique, in addition to square and rectangular products, objects of round and oval shape can be created.
Any material is suitable for weaving such products. Its choice is determined by the purpose of the thing. Decorative napkins, for example, are woven from fine threads, the same as those used for lace in other techniques. Bobbin threads are well suited for such products (you can knit from very thin bobbin threads by folding them several times), floss, crochet, “iris”, “poppy”, “chamomile”, “tulip”, “lilac”, “deer” and etc.
There are several ways of the initial stage of weaving round and oval products. The most appropriate way is weaving in a spiral.
Prepare five single threads, one of them should be about one quarter longer than the others. Fold a long thread in half so that one end is equal to half the length of the remaining threads. The long end of this thread will be used as the warp thread. Pass both ends of a long thread through the bend so that a loop with a diameter of 3-4 cm is formed.
Throw four single threads on the loop as a working base, tighten the loop tightly (as they say, “until failure”).
Attach the prepared weaving with pins to the pillow and start knitting. Additional threads are strung on the weaving warp thread between the main threads according to the scheme: two or three knots from the working threads - the introduction of an additional thread. Weaving always begins with knitting a brid in a spiral. Whatever the size of the future napkin, its dense center of the brid will always be woven from four to five single threads.
After completing work on the center, proceed to the creation of the main openwork surface of the napkin.
When copying a finished pattern for a napkin or developing your own sketch of a pattern, be sure to keep in mind that openwork napkins (especially large ones) with connections between elements in the form of loose threads are not strong enough. When used, they completely lose their shape - the threads are pulled out, the clarity of the pattern disappears. These items are hard to take care of. After washing, they must be additionally starched. And most importantly, they require a special, very time-consuming drying process: the napkin should be carefully stretched on a flat elastic surface and fixed with pins in order to restore and fix the pattern. If you want to avoid all these complications, weave napkins with a hard surface, for example, replacing loose threads with chains.
Stand for hot (see photo 15 on the insert)To make a stand with a diameter of about 35 cm, you will need: for the warp - about 4 m of thread, and for knitting a pattern - about 3 m. The stand is made from natural threads of great rigidity, such as reed or thick paper twine.
The stand must be impregnated with a special compound that will protect it from fire upon contact with hot objects (kettle, pots, pans). Such a fire-fighting composition is available in small-volume aerosol cans; it can be purchased at hardware stores (you can easily buy it on the eve of the New Year - it is sold everywhere to protect the holiday tree and furniture).
Before starting work, a measure of a little less than 15 cm in length is cut out of very thick cardboard or a piece of plastic. Then 4 m of twine are measured and, using the measure, the twine is folded into an “accordion”. Then the “accordion” is carefully assembled so that loops are obtained - in total there should be 25 loops.
Now you need to make a closed motive from the loops. To do this, a harsh thread is passed into the inner folds of the loops and tightly pulled together, collecting all the loops as tightly as possible. Thus, a closed motive "sun" is obtained.
It is necessary to ensure that the outer folds of the “sun” loops are rounded, whole, without joints from separate parts of the thread. The joints of the threads can be made in that part of the motif that is closer to the inner part - the connection is then masked with weaving threads.
Weaving starts from the middle of the stand. "Sun" will be the basis for weaving. The working thread is folded in half, one part of it is brought under the warp, the other - on the warp. Then the part that was under the base is brought to the base, and the one that was above the base is brought under the base. Thus, the technique used when weaving a flat knot is performed.
The first ten turns - the middle of the stand - are braided quite tightly, right next to each other. Two or three turns of the outer edge of the stand are also tightly weaved. These weaves will provide the stand with the necessary rigidity and strength.
In the middle of the stand, you can make any pattern (for example, weave a “wave” of knots).
Cache-pot with wooden balls(see photo 17 on the insert)
The length of the planter without a brush is 1 m 10 cm, the length of the brush is about 15 cm.
For work, you will need 32 single threads of 8–9 m each. It is better to choose threads that are dense, natural, of good twist.
Threads are measured and folded in half. From the place of the fold, 4 cm tracks are woven in both directions from double flat knots (8 cm in total). This path will become a loop for hanging the pots. Then the threads are divided into four equal bundles (8 threads in each bundle) and a motif is knitted from Josephine knots about 10 cm long. It turns out an element that looks a bit like a fir cone.
In this product, the "bump" of the "Josephine" knots is decorated with bunches of fringe, which looks out from the "bump" itself from four sides. It is very simple to make such a fringe: you need to cut 25-30 pieces of 4-5 cm long from the threads (the same ones from which the cache-pot is woven), divide them into two equal bundles, tie each bundle separately, impregnate the middle of the bundle with PVA glue. When weaving "knobs", fringe bundles are laid crosswise between the "Josephine" knots.
After the "knob" with a fringe is woven, two pairs of tracks are woven from four bundles of threads. Tracks within a pair copy each other.
The scheme of weaving the tracks of the first pair:
motif from one-sided flat knots;
"berry" of seven double flat knots;
motif of five double flat knots;
The scheme of weaving the tracks of the second pair:
motif from one-sided flat knots;
motif of five double flat knots;
motif of five double flat knots; "berry" of seven double flat knots;
motif of five double flat knots;
two pairs of festoons in the form of butterfly wings;
motif of five double flat knots;
motif from one-sided flat knots.
The tracks are braided to one line (length). Then each track is divided into two equal bundles of four threads each and motifs are woven from them, consisting of one-sided flat knots.
Wooden balls are introduced into the work: four threads from both motifs of flat knots are threaded into the through hole of the ball, two working threads (left from the left motif, right from the right motif) go around the ball and fix it with one double knot at the bottom.
After that, the threads are again divided into two bundles of four threads and the motif of one-sided flat knots is repeated.
Then the threads are combined and the same motif is knitted (but it turns out to be larger, as it is woven from all the threads of the track).
Then, on all paths, they are woven: two pairs of festoons in the form of butterfly wings, four double flat knots and again two pairs of festoons in the form of butterfly wings, and after them - a motif of one-sided flat knots.
Next, you need to separate the threads for weaving the basket: from each track, two motifs from double flat knots are woven, which are interconnected by “wings” of double scallops, another motif is weaved from double flat knots, after which small paths are combined and four motifs are woven from double flat knots. nodes.
The threads are tied into a brush, which is wrapped around several times to secure the work.
Then, a finished brush or a bunch of decorative fringe is hung on a bunch of threads left over from weaving.
Cache-pot with acorns(see photo 18 on the insert)
The length of the planter without a brush is 1 m. The length of the brush is about 10 cm.
For work, you will need 32 single threads of 8 m each and eight acorns with drilled through holes.
Threads are measured and folded in half. From the place of the fold, 4 cm tracks are woven in both directions from double flat knots (a loop for which the planter will be hung). Then the threads are divided into four equal bunches (eight threads in each bunch) and the “bump” motif is knitted from the Josephine knots about 5 cm long.
From four bundles of threads weave four tracks. In this planter all the tracks weave according to one scheme:
perform a motive from one-sided flat knots;
acorns are included in weaving: the warp threads are threaded through through holes, the working threads are wrapped around the acorn from the outside on the sides;
repeat motifs from double flat knots; combine the threads of the track (eight threads are obtained) and weave a motif from one-sided flat knots;
make one turn of one-sided flat knots;
weave a motif from double flat knots;
weave a "berry" of seven double flat knots;
Two turns are made from one-sided flat knots;
perform a motive from one-sided flat knots;
Divide the track into two equal parts (four threads each) and weave two motifs from double flat knots;
perform two double flat knots.
After that, they go to basket weaving:
divide each track into two equal parts (four threads each) and weave two motifs from double flat knots;
connect motifs from double flat knots of one track to each other by means of scallops;
repeat the motif of double flat knots;
The threads of the motifs of two adjacent tracks are combined (the right motif of one track is connected to the left motif of the other) and a common motif of five double flat knots is woven;
all threads of the product are collected in a bundle and tied with a simple knot.
Then three or four threads are wrapped around the bundle to secure the work. The finished brush is hung on the beam.
Cache-pot with two tiers(see photo 19 on the insert)
The length of the planter together with the brush is 1 m 60 cm. The planter is made of very thin linen threads, and it is very difficult to count them individually. Therefore, the number of threads required for work can be determined by eye: it must be a bundle of at least 1 cm in diameter. The length of the threads is about 15 m. For work, you will also need two plastic rings with a diameter of about 5 cm.
Threads are measured and folded in half. From the place of the fold, 5 cm tracks are woven in both directions from double flat knots (a loop for which the pots will be hung). Then the threads are divided into four equal bundles and a motif resembling a fir cone 14–15 cm long is woven out.
Separately, four motifs are woven from one-sided flat knots about 8 cm long. These motifs are laid in the last knots of the "knob" and attached to a plastic ring.
Upper tier
Cord weaving pattern
Weave four identical tracks according to the following pattern:
motif from one-sided flat knots;
four double flat knots;
motif from one-sided flat knots;
four double flat knots;
motif from one-sided flat knots.
The scheme of weaving the upper basket:
from each track, two “snake” chains are knitted;
the chains are combined, weaving a “berry” of four flat knots;
the threads are again divided and weave two more chains of “snake”;
the threads are connected and weave a brida in four turns. During weaving, new threads are introduced into the weave (about 50% of those threads that were used to knit the upper part of the cache-pot).
lower tier
Cord weaving pattern
The threads are divided into four equal parts and weave four identical paths according to the scheme:
motif from one-sided flat knots;
double flat knot motif;
motif from one-sided flat knots;
double flat knot motif;
One-sided flat knot motif.
Then they move on to weaving the lower basket of the cache-pot.
The lower basket is double, it consists of an inner and an outer part. The inner part is woven from the same threads with which the previous part of the planter was woven, the outer part is made from additionally hung threads.
The scheme of weaving the lower basket
The inner part of the lower basket is woven according to the scheme:
Two chains "snake";
"berry" of four double flat knots;
Two snake chains.
The outer part of the lower basket is woven according to the scheme:
From each track, three pairs of “snake” chains are woven from the hung threads;
at the level of the "berry" of the inner pots, chains of adjacent tracks connect and weave three double flat knots;
The threads are divided into 12 parts and again three pairs of “snake” chains are woven;
chains of adjacent tracks connect and weave two double flat knots;
the threads are cut, forming a decorative fringe.
Weaving is completed as follows. The threads from the inner basket of the cache-pot are connected and woven into a brid in five turns. During weaving, additional threads are imposed (about 30% of those threads with which the previous part was knitted).
From the brid, seven motifs are woven from one-sided flat knots that are attached to the ring. Seven more motifs from one-sided flat knots depart from the ring. After that, the brida is woven in four turns, the threads are cut to one length, forming a decorative brush.
Macrame is a type of needlework based on weaving knots.
In ancient times, needlework was an integral part of a woman's life. The ability to create beauty for girls with their own hands was a must, and sometimes even helped to successfully marry.
Today, applied art is back in fashion. Needless to say, do-it-yourself openwork napkins, wicker tablecloths and even woven carpets not only decorate the interior, but also warm our souls. Macrame is one of the most beautiful types of creativity. We offer the simplest macrame lessons for beginners, thanks to which you will learn how to quickly and easily create hand-made masterpieces.
A bit of history
Mastering the alphabet of weaving macrame for beginners, you should get acquainted with the history of original art. Its roots go deep into the centuries, taking us to the shores of the mysterious East. The name is of Arabic origin, which means "braid, fringe, lace." According to historical data, unusual needlework appeared in Europe in the 7th century. It is believed that such art was known back in Ancient Egypt, Iran and China. The secret writings of the ancient Incas were very reminiscent of modern macrame. With the help of skillfully tied knots, they conveyed important information. Over the mystery of the knot writing of the Incas, scientists are still racking their brains. The first reliable artifact that clearly tells contemporaries about the existence of unusual creativity is the picture of the talented Botticelli "The Adoration of the Magi", where one of the characters in the canvas is wearing a cap woven in a similar way.
 The famous painting by Botticelli "The Adoration of the Magi"
Art is a knot knitting technique. Having mastered the basics of the simplest patterns for macrame for beginners, you can weave macrame in the form of bracelets, fashion accessories, tablecloths, clothing and even interior.
A new era of craft came in the 19th century, technology acquired new features. It was at this time that art finally got its name. Samples of products of that time today are of particular value and are kept in museums, dedicated to history needlework. In the 20th century, the peak of popularity comes again, needlework comes into fashion, thematic leisure clubs are created, where craftswomen learn new patterns of weaving, share their experience, and tell those who wish how to weave all kinds of jewelry. Many have associations with Soviet wicker owls and flower pots. Today, macrame takes on unusual forms, craftsmen are actively looking for new design solutions, creating masterpieces of amazing beauty and sophistication.
A little about macrame
Where to begin?
Hand made products are often presented at various creative exhibitions, where experienced craftswomen and beginners share their secrets and their successes in various creative fields with pleasure. In the nodular technique, it is easy to create openwork tablecloths, panels, lampshades, vases, curtains and napkins. This brings notes of original style, warmth and comfort to any interior. In addition to interior masterpieces, using the macrame technique, you can knit amazing jewelry and accessories that will become the highlight of a fashionable look. To understand how to make this or that product, to master the craft, you need to learn the alphabet and the simplest techniques.
preparation lesson
And you should start with the selection of tools and materials:
- The basis of any product is threads. It can be clothesline, cords, soutache or twine. The main condition is the absence of pile on the surface. Increased "shaggyness" will hide all the beauty and relief of the pattern. To make it easier for beginners to learn how to knit the basic knots of macrame, it is recommended to use a cotton rope of medium thickness.
- Pillow for weaving. A handy tool that will help beginners quickly and easily master the knotting technique. Instead of a pillow, cardboard tablets, boards covered with foam rubber and covered with fabric are used. Experienced craftswomen do without it at all, doing work on a sofa, chair, or whatever is more convenient for you.
- Stationery and sewing kit. In work, you can not do without sewing accessories, pins, stationery glue or PVA, sharp scissors. In some situations, they resort to the help of lighters, singeing extra threads.
The weaving process should always start with one thing: you need to determine the length of the threads.
The length of the thread is simply measured: it should be eight times longer than the product that is planned to be woven.
The length of the rope is also affected by its thickness, the larger it is, the longer the working thread should be. Often beginners in the process are faced with a situation where the thread ends unexpectedly. In this case, you should not be upset, you can just gently glue the thread while continuing to weave.
Threads for work
To understand the features of macrame and schemes for beginners, you should learn proper preparation to the weaving process.
Multi-colored threads


Everyone who begins to learn macrame lessons should remember that there are two types of threads for weaving with different functions:
- Main thread. Its edges are tied with a simple knot, pinned with pins to the working base. At the same time, it performs the function of a place for fixing knots that are tied with a working cord, and does not take part in the process. The length of the base must be no less than the width of the finished work.
- Working threads or cords. The length of the working segments is equal to at least twice the length of the future product. At first, it is not easy to determine the exact length, so the diagrams contain comprehensive information about the necessary measurements.
Threads and cords in macrame
Determining the optimal cord length is not only the key to success, but also comfort in the weaving process. Too long cords get tangled, making a lot of inconvenience. To avoid discomfort, you can wind the excess on the coil, attaching it to the base. Resourceful needlewomen resort to tricks, using curlers with an elastic band instead of coils. If the working thread runs out, you can always lengthen it by unwinding the spool or gluing the end to the end.
Mastering the basics: varieties of knots
The most common area of use of macrame craft in modern world- Creation of custom jewelry. Having mastered the knitting of the simplest knots, you can weave beautiful Shamballa bracelets, friendship baubles, openwork necklaces, earrings.
The main knots of macrame
square knot
In most schemes, it is located at the base of the product.
The master class is as follows:
- We fix two cords on the working basis so that four free edges are obtained at the output.
- We take the extreme right thread in our hand, draw it over the central segments, winding it neatly at the end on the left.
- The one that is located on the left, we lead under the central segments. We stretch it into the hole formed between the central threads and the right from the edge. The left thread is laid on top of the right.
- The one that is now on the right starts under the central ones, but on top of the one that is already on the left.
- The left part is placed in the center, penetrating the hole from the other side, under the right thread.
As a result of simple manipulations, a beautiful square knot is obtained.
square knot


If you use half of the element in weaving, then the resulting chain twists beautifully in one direction.
A long row of square knots with multi-colored threads will form the basis of a simple but stylish decoration. Optionally, you can weave beads or beads.
Lesson on knitting a square knot
The simplest patterns for beginners often consist of weaving primitive knots. This does not mean that such products are not beautiful or original. On the contrary, it is often from simple elements that complex openwork is created.
 The simplest scheme for beginners: weaving a bracelet
Learning to knit a looped knot:
- We fix the base cord on the working basis, tie the nodular part. You can take cords of different colors, this will help the beginner not to get confused.
- A working thread is superimposed on the knotted part, rotated counterclockwise, the end is launched into a loop and tightened.
- We put the thread located on the right, under the knot, start the working part to the right of the knot, perform the maneuver in the same way, but in a mirror image.
Such knots are the simplest basis for creating exclusive products using the macrame technique.
DIY shamballa bracelet
Weaving is a laborious but fascinating process. Beginners are not recommended to immediately take on large-scale projects, honing their skills on miniatures.
 The Shamballa bracelet is one of the most popular pieces of jewelry worn by people of almost all ages.
A handmade shambhala bracelet is not only a stylish decoration, but also a charm for good luck. To work, you will need beads, a Tibetan cord, waxed or leather, second glue.
Weaving algorithm:
- We cut off two cuts from a skein of thread 40 and 80 centimeters long. The length of the working thread depends on the girth of the wrist. The short section will become the base, and the longer one will be the working thread. Tie them together with a simple knot.
- Let's start weaving. Draw the right end under the base, and then over the left end.
- We take the left end of the working part, we lead it over the working part under the right end. We “dive” right into the loop and begin to tighten. We repeat the maneuver, but now we start on the left. In order not to get confused, you can repeat the mantra "to the right under-over-dive, to the left under-over-dive." By speaking out loud the algorithm, weaving is easier to bring to automatism.
- Having knitted several knots, we string a bead on the working part. So we repeat until the end of weaving.
- To prevent the ends of the thread from fraying, you can gently singe them or smear them with transparent nail polish.
To make a convenient lock, you can use a metal carabiner. But a true Shambhala bracelet is woven only with a thread lock. To do this, we will tie another piece of cord 40 centimeters to the end of the working thread with a simple knot. Weave according to the algorithm “right under-over-dive, left under-over-dive”. Don't tighten it too tight so that the bracelet opens and closes easily.
Bracelet Shambola
The world of weaving macrame has many faces, it can take on any shape and form. It all depends on the skill, imagination and desire of the craftswoman. Having tried once, it is impossible to stop, the process of knitting knots relaxes, calms and helps to put thoughts in order.
Macrame is a technique of knitting various things with the help of knots. To work in this technique, first of all, you need to master the basic knots of macrame. You can do this using step-by-step diagrams.
flat knot
These are the very first and simple knots in this technique. Flat knots are right-sided and left-sided.
To weave the left side, you need to take the left working thread and bend to the right, on top of the rest. Then take the right working rope and put it on top of the left one. Bring it under the rest of the threads and stretch it into the created loop.
The right flat knot should be woven in the same way, only in a mirror image. Weaving should be from right to left.
Square or double flat
This knot is the basis of many products. It consists of two elements: right side flat knot and left side flat knot. The photo shows the order of weaving.


From numbers 1 to 5, a flat right-hand knot is shown. From 6 to 8 - left-handed. When they are intertwined, a square knot is formed.
This is how several square nodes connected by a chain look like:

rep look
This is one of the most popular macrame knots.
With the help of these knots, horizontal, vertical and diagonal brids are woven. This is the name of the rows consisting of reps knots.
Horizontal bridles. On the basis, fasten as many working threads as you like. The outermost thread on the left should be especially long, as it will be the main thread. It can not be cut off from the ball at all. The remaining ropes should be 4.5 times longer than the future product.


The leftmost thread must be pulled horizontally to the right over the other threads and secured with a pin. From the next thread on the left, 2 one-sided loops are made on the basis. Then tighten tightly and the working thread is left to hang vertically. Take the next thread and repeat weaving - you get a horizontal brid.


After weaving knots with all working threads, the warp turns to the left, horizontally. With the right hand, a horizontal brid is woven from right to left.
At the place of the turn, fasten the thread with a pin, otherwise it will come out sloppy.


Diagonal Brides. These knots are very popular in macrame style. Of these, you can weave crosses, rhombuses, circles, flowers, petals.
Pull the right thread at an angle down and to the left, above the other threads. Cast on 2 one-sided knots with each working thread. Just need to fasten the thread with a pin in the upper right corner.


In the brids, which are woven to the right, it is necessary to pull the left extreme thread down and to the right.


If weaving 2 brids close together, then for each next one you need to take the extreme rope and pull it near the previous one.

It is possible to start from the center and weave diamonds - first the left side, then the right.


Vertical Brides. Here is a tight weave. Usually used for weaving rugs, belts and other products that require tight knitting. The thread on which others are hung is a working thread. No need to cut it off the ball. The remaining threads are the basis and their length is the basis of the finished product.
You should start from the top right corner. Fasten with a thread pin. With your right hand, pull the first warp rope and weave two one-sided knots onto it. Continue the row to the end. Turn the working rope to the right and secure with a pin. Pull the warp threads with your left hand, and with your right hand weave one-sided knots with a working rope. Continue to end of row. And so on.

This is how the main knots for beginners look like in macrame.
Video on the topic of the article
Here you can see a video about the manufacture of various macrame knots.
")


 Elder Paisios Svyatogorets")

